Painting Zombies
I've been having a good time with Last Night on Earth, but poking around on BoardGameGeek I've always been a little jealous of those swank miniatures that some people have painted.
I've also noticed that it's very possible to confuse the heroes while
playing, so the painted figured do serve some functional value. So I
decided to take up an arts and crafts project to paint the pieces from
my game.

I've never painted anything like these soft plastic miniatures before, so I posted a query
to the BGG crowd for tips. And I'm so glad I did, because those people
were ridiculously helpful. Armed with pages of discussion on optimal
painting techniques I headed to Michael's to get my materials.

Supply list:
- Apple Barrel 24 color acrylic paint set - $4.99
- Apple Barrel white, 2oz - $0.79
- Apple Barrel black, 20z - $0.79
- Delta Ceramcoat matte interior varnish - $2.29
- Loew-Cornell set of four sable brushes - $6.99
- Elmer's adhesive putty - $1.99
- Solo bathroom cups (package of 80) - $2.39
The first step was to wash the minis. Apparently they have some residual stuff on them from the mold, and if you don't wash them the paint will have problems sticking. So I washed all the minis and left them to dry for a couple hours.

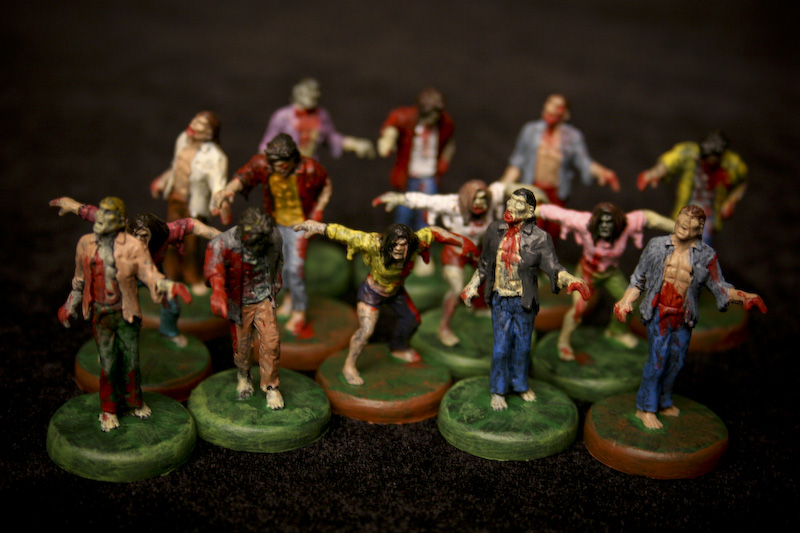
The
next step was to prime them. I started with the zombies, because
you've gotta screw up pretty fierce to make zombies look bad. Two coats
of black paint later, my zombies were looking like freaky little tar
monsters.

Someone
from the boards had the excellent suggestion of using sticky tack to
affix the figures to something so I didn't have to actually touch the
figure while painting. Thus the plastic cups. There are two colors of
zombies, green and brown, and since I needed to preserve that in my
final output I marked the cups with either a "G" or "B".

With
all the prep complete it was time to break out the color. I wanted to
preserve the original skin tone difference between the two sets of
zombies, so I mixed two not-quite-human skin colors. After the skin was
painted on zombies I was able to go nuts applying various clothing
colors to them, making full use of the 24 colors in my palette. Lastly I
finished off the bases, starting with a dark-green base (to match the
game board) and then accenting them with either a light green or brown
to bring back the two zombie team colors.

The
final step was to apply a coat of matte varnish to make sure that the
paint won't wear down as the figures get handled during gameplay.
You can see more photos of the final result here.
Personally, I'm extremely happy with how they turned out. Now that
I've cut my teeth on the zombies, the next step is to tackle the heroes.
There's more detail to worry about with the heroes, but the core steps
should be the same. I'll post photos when I'm done.

No comments:
Post a Comment