Friday, March 29, 2013

Paint rust and chipped


Paint rust and chipped paint like a Golden Demon winner

Although historical modelers have been doing realistic weathering for many years already, fantasy and sci-fi miniature painters often lack the knowledge how to paint rust and chipped paint or other kinds of weathering. Stefan Kochowski (Illusionrip), winner of many Golden Demon awards, tells us how he achieves these effects:
In this receipt we’ll make rust for 4 persons, so if you need it for 8 persons just double the proportions.
Preparation: 2 hours
Cost: 50 Polish dollars
Difficulty: not super very difficult ***
    So for this operation we will need:
  • Maskol
  • airbrush
  • Tamiya putty
  • yellow tac
  • 2 hands: one left and one right
  • used brushes but with more or less thin point
  • white primer
  • paints for airbrush
  • 4 sausages with ketchup
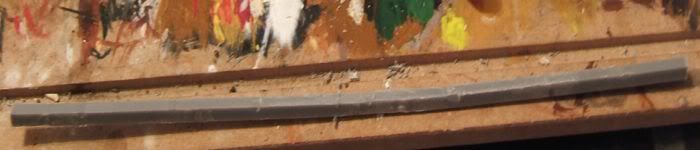
We begin with priming our object in GW white, in this case I have chosen a Forge World tank dozer blade. Normally I would use some Mr Neo surfacer to make the whole object smooth, but today I had no time so we’ll have to make it messy like a piglet……
Rust and chipped paint - Tutorial
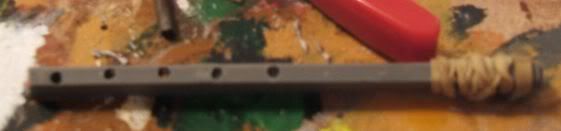
I would like to make some texture on it, but if you want you could skip this step. For this I use some Tamiya putty. With a big brush I put some putty on a plate, take the putty and just apply it on my blade. Then I’m tapping the putty with my brush, to give it an effect of hard rust attack.
Rust and chipped paint - Tutorial
After this step, you have to wait about 30 minutes to let the putty dry on your object. While drying take a plate, a fork and a knife. It’s important not to skip this step or you risk having bad rust. Then put the 4 sausages and the ketchup on your plate. Take the fork and the knife, cut a piece of sausage, put it in the ketchup and then in your mouth, swallow the piece of sausage, and repeat the operation until you don’t have sausages on your plate anymore.
Now your putty is dry…..
Rust and chipped paint - Tutorial
Now we will basecoat our blade with our first rust color. So we set up our airbrush, and regulate the flow on a white paper, to avoid mistakes on our object. Don’t forget to wash your airbrush scrupulously between applying each different color. The problem with acrylics is that they dry too quickly in an airbrush, so the airbrush could stop working quite quickly.
Rust and chipped paint - Tutorial
Then we apply our scond layer of rust, a darker one. We won’t apply it on the whole object, but only where the rust could be the oldest. Fresh rust is orange, old rust is more blue dark, so try to find a part of your object where the rust could be the oldest.
Rust and chipped paint - Tutorial
Now it’s time to use a smelly product called Maskol. You could find it in all modeling shops. This works like a latex tape.
Rust and chipped paint - Tutorial
To apply it we will use the sponge technic: Take a piece of green sponge, you know the one who is the hard part of two-layers sponge. If your wife or your mother catch you stealing and cutting a piece of sponge, ignore their remarks and just tell them with a totally detached attitude: “You, my dear, don’t understand anything about the art, it is not the artist who is going to the paint but the other way”. Use the moment while your mother or wife are trying to understand the sentence you just told them to escape and return to your project. (I can bet that after such a sentence your mother or your wife will have the biggest respect for you.)
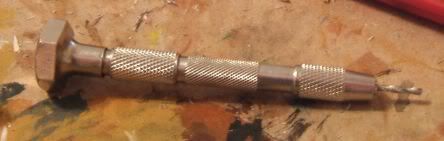
Here is the tool:
Rust and chipped paint - Tutorial
With the sponge you take some maskol and tap it on a tissue to remove the most of Maskol (more or less like in the the drybrushing technique).
Rust and chipped paint - Tutorial
Then you tap your sponge on the blade, and you repeat the operation until you are satisfied with he result. Beware to never use maskol with a brush, because maskol can’t be removed with any thinner, so the brush will definitely go out of order.
Rust and chipped paint - Tutorial
Now, we should let the maskol dry, count about 15 minutes. If you have some sausages again, do no hesitate….
Now we will apply our last layer with an airbrush. I use a turquoise color, for this I mixed blue and green/khaki and grey to desaturate the color and then make contrast with the rust.
Rust and chipped paint - Tutorial
I apply a darkest first layer on whole he object.
Rust and chipped paint - Tutorial
Once it’s dry, apply a second one – lighter and with a little zenithal effect, I mean that I only airbrush it from the top of the object.
Rust and chipped paint - Tutorial
Now it’s time to let this bloody rust appear. I use some yellow tac for this, but you could use blue tac or white tac. I think that a rubber eraser could work too, but I haven’t tried.
Rust and chipped paint - Tutorial
In fact I use my yellow tac like a gum to remove the liquid mask and then let our rust appear.
Rust and chipped paint - Tutorial
Now we will give our rust some more volume. Just under it, apply a very thin line of the turquoise color but with a lot of white in it with a fine brush. It will give this aspect of depth to your scratches.
Rust and chipped paint - Tutorial
Now we will add rust but with several washes of brown in all the edges, to give our object some deepness and richness. We could simulate some thine line of brown under rivets, to simulate streaks of rust.
Rust and chipped paint - Tutorial
And then we will add some glazes of bleached bone to define the different part of the blade.
Rust and chipped paint - Tutorial
I hope it will help you, see ya soon,
Stef.

Saturday, March 16, 2013

use for old sprues

Well you can use them for this (this is from my Zoo Diary)

you will need some old sprues, tooth pics, a pinvice and some rubber bands


then cut if all the little sticky out bits so it looks like this


once you have 2 done attach them with sticky tape or rubber bands and drill holes as such you need to do this or they may not line up


then place the tooth pics in the into the holes as such and glue


once that is dry cut of one side of the tooth pics and glue to base I used super glue and PVA


once you have done that repeat as nessary :lol: 
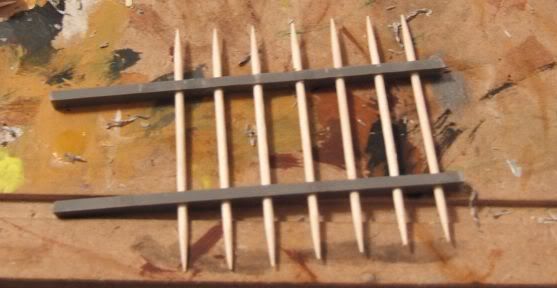
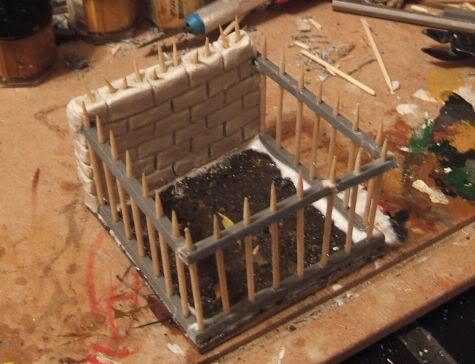
I only did 3 sides to mine as I wanted a brick fence out of Das on a sheet of plastic like so


then I attached it to the model and made some more brick work on the back


then just to finish it of placed the cut of tooth pic bits on top of the brick wall and super glued them as well


well there you go I hope this give you some Ideas

paint metal and ground


Login

Feeds

Home arrow Tutorials arrow Basing arrow Review :: Dragon Forge Design Resin Bases
Review :: Dragon Forge Design Resin Bases Print
Written by Dan "YoungWolf7" Smith   

Painting

Since I had been out of the painting game for quite a bit I was completely out of my favorite Dupli-color Black primer. I had some Krylon Flat White primer on hand so I chose to go with that and perform an experiment I'd been meaning to try for some time now for just such an emergency. The idea is to prime with the white and then wash with black, to cover 80~90% of the white, giving you the best of both essentially. The trick is will it obscure fine details?
Image
Image


I decided to try 2 options since I had 2 bases to work with. For the first base, I used straight P3 Armor Wash. For the second base, I used a concoction of my own which I call "Grunge Wash". It's essentially VMC Smoke, VMC Black Glaze, Matte Medium, and distilled water mixed up in a dropper bottle. Here's the results:

Image
Image


As you can see, the P3 Armor Wash was pretty thin and didn't stick very well to the flatter surfaces. This could be mitigated somewhat by adding some Matte Medium, but that won't help the thin pigmentation coverage. My "Grunge" did much better, especially considering that's straight over bare white primer. I designed it for simulating oil & grease streaks, so it had to stay where it was applied. For caked on oily dirt I sprinkle a little fine sand into it before it dries to give it texture.

So experiment over, I gave both bases another quick wash of thinned black paint to set them both to black and move on.

Step 1
Base coat all metal objects with P3 Pig Iron (or other steel metallic of your choice.)

Image
Image


Step 2
Base coat the dirt areas with P3 Gun Corps Brown (or other light brown of your choice.)

Image
Image
Step 3
Base coat the rocks with P3 Trollblood Highlight (or other warm gray of your choice.)

Image
Image

So now all of the elements on these bases have been picked out in one of three colors. While that might seem overly simplistic, bear with me. We can make this as simple or as complicated as we want later on.


Step 4
Wash all metals and dirt with thinned P3 Bloodstone (or other red brown of your choice.) Matte Medium is important as you want this to stick on the flat areas of the metals as well as run into the recesses of the dirt and such. Allow to dry thoroughly.

Image
Image

Step 5
Wash all metals and rocks with thinned GAFA Payne's Grey (or other dark blue of your choice.) Again, Matte Medium is important as you want this to stick on the flat areas of the metals as well as run into the recesses of the rocks and such. Allow to dry thoroughly.

Image
Image


Step 6
Wash everything with thinned P3 Umbral Umber (or other dark brown of your choice.) Once again, Matte Medium is important as you want this to stick on the flat areas of the metals as well as run into the recesses of the dirt and such. Allow to dry thoroughly.

Image
Image


At this point, if you're in a hurry you could clean up the edges and call it done. Especially if you're painting a mass of bases at once. You can always come back later and pick out a few details to fix them up a bit as you have time.

Step 7
Drybrush the rocks with P3 Cryx Bane Highlight (or an olive drab of your choice.)

Image
Image


Step 8
Drybrush the rocks again with P3 Trollblood Highlight (or the warm gray you base coated them with.)

Image
Image

Step 9
Drybrush the dirt with P3 Gun Corps Brown (or the light brown you base coated it with.)

Image
Image

Step 10
Drybrush the dirt with P3 Hammerfall Khaki (or a tan / bone color of your choice.) Catch the highest edges of the rocks as well.

Image
Image

Step 11
Highlight the metal objects with P3 Pig Iron (or the metal you base coated them with.) The metallic will "pop" in comparison to the dull washed areas around it. You don't need to go any higher up in value of color unless you want to show a "new" metal. I'm after aged and weather metal bits here, so just a few shiny edges here and there are more than enough to convey the idea that they are still metal.

Image
Image

Step 12
Lightly wash the dirt areas with thinned P3 Umbral Umber (or the dark brown you used before.) I do not do this uniformly. I try to mottle the dirt and break it up. I also use the brown to outline the objects where they meet the dirt and deepen the crevices in the rocks.

Image
Image

Step 13
Rust. I alwyas see questions about how to make good looking rust. If you don't have a bottle of VMC 131 Orange Brown do yourself a HUGE favor and buy one. You'll wonder how you ever got by without it. My rust always starts out as thinned VMC 131 Orange Brown. I then add other colors to it to push/pull it in the direction I want it to go. In this case I added a slight bit of the P3 Bloodstone to tie it back to the coloration of the metals. Apply as sparingly or as liberally as you want. Remember that rust usually collects where water collects, so in this case around the edges of the plates and in the recesses of the gear, etc. I also spread it out into the dirt as it will stain the dirt around it. (Which is why I made sure the dirt was painted first.)

Image
Image

Step 14 + 15
Brass. The brass casings are easy. Since they're already based, I just lightly highlight them with VMC 174 Brass. This paint doesn't have great coverage (like any gold based paint) but when you go over a silver base it's a snap. To simulate oxidation and tarnish I hit them with the thinned P3 Umbral Umber again.

Image
 
Image


Step 16
I paint my base rings black. I know that's not popular in that "other" game circuit, but it works for me. Several coats of dull spray sealer and the paint is finished.

Image
Image


Image
Image

Finishing

To finish these up I just glued a few dabs of burnt static grass to contrast with all of the brown and added some Still Water mixed with green ink in the recess on the second base. I'll likely add some ripples to this once I get the planned model attached to it.
Image
Image
Image
Image
Image
Image
Image
Image
Image
Image
Image
Image


Conclusion

So here is the official YoungWolf7 Review of the Dragon Forge Design Wasteland II series of resin bases:
Quality: 9.5 / 10
The quality of these castings still impresses me. I've seen much worse out of so called "pro" operations. (No, I won't name names.) Knowing that Dragon Forge is essentially a one-man operation makes it even more impressive.
Creativity: 9 / 10
It's obvious a lot of thought went into placing the objects on the bases so that there were still plenty of options to attach model's feet to them. All too often you'll see a cluttered base with no place to stand a model. To me that's a complete waste of time. These are easy to deal with, with room to add more stuff if you like.
Variety: 9/10
It's not often that you'll see 10 different bases in a trooper size, but you do here. I'm a variety junkie though, so I crave even more. Dragon Forge does have other base lines that are designed to complement / interchange with the Wasteland II bases so I'll be picking those up very soon.
Paintability: 10 / 10
The acid test for me was how fun were they to paint. These were fun and I'm already eyeing the rest of the range even though I'm supposed to be recovering right now.
Overall: 9.5 / 10
To say that I'm happy with these bases would be an understatement. I can't give them a perfect rating as nothing's perfect, but they're darn close IMO. To our WARMACHINE / HORDES readers: you may notice that Dragon Forge doesn't currently offer much in the way of WM style round lip bases. They are working on this and are completely open to suggestions. Contact Jeff through their website and tell him what YOU would like to see. I've given him my suggestions, and maybe when I'm fully recovered I can start helping him out by sculpting a few. I can tell you that if I hadn't sold off my Mercs to pay bills they'd be standing on his square cut slate tile bases though. Those are cool for city-dwellers.