Friday, May 31, 2013

1/72 Zombies step-by-step Pt. 3: Zombies complete!


(Sorry about the photo quality: our better camera conked out just as I was about to take these, so I had to resort to the old one.) Zombies are finally complete! Part 1 of this tutorial covered modding figures to make 1/72 zombies, part 2 covered actual painting, and this part will cover finishing touches, including the "magic dip" method for adding outlines and shadows.
1. The first step is to finish the bases. I just paint them with a couple coats of flat black paint. I don't like anything more detailed, preferring as neutral a base as I can so I can feasibly use these figures for a number of scenarios. If I added static grass, for example, they would look strange in an indoor dungeoncrawl.

2. The eponymous "dip" is this stuff: Minwax Polyshades, Classic Black Satin finish. It's wood stain and finish in one.  The figure is mounted here on a battery-powered drill: this is another reason I glue my minis to nails when painting. Some people prefer the control of painting the "dip" onto their figures, but as I find one needs to wipe the dip off no matter what, I like actually dunking the figures in the dip

3. I do this with a box nearby and plenty of paper towels on hand. I open the can, dip the mini while holding the drill, then immediately hold it over the box and spin the drill, to shake off most of the excess dip. Be sure to do this in a well-ventilated area, and to put the lid back on the can when you aren't using it to minimize exposure to fumes.

4. After it's dipped, you'll need to remove even more excess dip. Blowing on the mini while it's in the box will get rid of the globs that tend to accumulate between arms and legs, and a paper towel will soak any dip that pools in the neck and other places. Dab if you want to reduce the amount of dip, and wipe if you want to remove most of it. By the way, your minis usually won't turn out this dark: I have a problem with too-thick dip that I'll need to solve.

5. Give the dip at least a full day to dry. Even with the satin finish instead of the gloss, the dip looks way too shiny for most minis. A matte spray will solve this problem, and will also provide another layer of protection. Do this outside on a fairly warm day with fairly low humidity, and be sure to rotate the figures and spray as much of them as you can.

6. Give the matte around an hour to dry: You'll see that it kills the shine and also gets rid of a lot of the blobbiness the dip leaves. At this point you can simply pry the minis off the nail head, and they're mostly ready to go (the nails are reusable). You may want to use a hobby knife or emory board to get rid of any excess glue or paint that accumulated around the nail head on the bottom of the miniature, so it will rest flat on the table.
 I hope this tutorial was helpful to at least some of you. As I mentioned, I'm concerned by how dark and splotchy the dip is leaving my figures lately. It's a decent effect for zombies, but I used to get a much cleaner look from this method. I think the problem is that I was lazy about fully sealing the can of dip when I was done with it, which allowed for a degree of evaporation that has now left the dip too thick. I need to figure out a way to thin it with something that won't eat my plastic figures. I'd welcome any suggestions!

1/72 Zombies step-by-step Pt. 2: Painting

1/72 Zombies step-by-step Pt. 2: Painting

Last time, we performed some simple head swaps to create the Unpainted Undead.
Now let's get them looking a little less unpainted and a little more undead. These are some pretty basic tips here, as my painting doesn't involve much fancy technique, but everyone needs to learn the basics some time.
1.) The first step is to wash the figures with a mix of dish detergent and water, scrubbing with an old toothbrush. This cleans off the mold release agent miniature makers use, which can keep paint from sticking.
2. Next, I superglued the minis to their base, here a 3/4" fender washer. Usually the base that's molded with the figure will cover the hole in the washer, so I don't usually bother with more complicated basing. I then glued the washer to a framing nail, so the mini can easily be handled or kept in a styrofoam block when not in use.

3. I then sprayed the miniatures outside with a white plastic primer. You need a fairly warm, fairly low-humidity day to do this, or the primer won't stick or dry correctly. I make sure to rotate the figures so I cover as much as I can. I'm not totally sold on Krylon as a primer, but it provides a bright, fairly even palette that along with washing the minis will ensure the paint sticks.

4. One impulsive modification I made was to hack at the zombie bodies with a hobby knife, so they looked a little less like the healthy barbarians they originally were and more like the decomposing undead monsters they are. I painted these areas first. If I was smart, I would have also painted the teeth and eyes at the time.

5. Instead, I started painting the fleshtones, here a livid blue. It's a little bolder than what's probably realistic (for the walking dead, that is), but I like my hordes to have a distinct, consistent color scheme, and I hadn't painted a blue army yet. You can see that since the wounds are a layer beneath the zombie skin, it makes it easier to paint the skin over and around the wounds than the other way around. This is also why it would have worked better to paint the eyes and teeth first.

6. Here are the eyes and teeth painted in. I typically need at least two coats of paint to cover, so it wasn't that big a deal to repaint the flesh around the eyes and teeth once they were colored. I usually don't bother painting facial details, but the mouths on these minis are very obvious, and I thought the yellow eyes would give some zing to what would otherwise be a very unlively (heh) color scheme.
7. And here's our undead friend with all the color on him. I could have showed more steps, but I basically just blockpainted the zombie's clothes, with a little bit of drybrushing (painting raised areas with a brush with most of the paint wiped off) to bring out the details on the scabbard. Most of the paint I use is Delta Ceramcoat, a craft paint sold in stores like Hobby Lobby, along with some even cheaper brands. If I used tricks like outlining or wet-blending, I'd probably use paint specifically blended for miniature painting, but the cheaper paints are just fine for my purposes.

Zombies step-by-step Pt.1: Head swaps


I'm getting ready to start my next project, so I figure I should put together a step-by-step guide for putting together and painting miniatures the Cheap Fantasy Minis way. I haven't painted any undead yet, and zombies are the obvious choice. Surprisingly there aren't many generic zombies available in 1/72 scale, but that's where this tutorial comes in. By cleverly chopping up and reassembling existing figures, you can have a miniature shambling horde in no time.
1. Necessary materials include a hobby knife, super glue, a pin vise with a very thin bit, a pushpin with a round head, a suitable miniature for the body (here, a tan Italeri barbarian), another for the head (a gray Caesar Miniatures skeleton), and a pair of needlenosed pliers with wirecutters. I've already separated the heads and bodies with the knife: When doing so, keep as much of the neck on the head as you can, and remove as much of the neck from the body as possible.

2. Take the pin vise and drill a hole in the center of where the neck was on the body figure. Obviously you don't want to drill all the way through the body, but you can go deeper than you'd think. The deeper you can go, the more secure the bond between the new head and body.

3. Position the head in the pliers as show, upside down with the neck pointing up.

4. Carefully drill all the way through the head with the pin vise. Start slow, and make sure you don't continue drilling through your workbench.

5. Add a little super glue to the hole in the body. Remove the head from the pin vise and push the pushpin through the top of the head in the hole you just made, as shown. Push the pin as far down as you can, hopefully just a little deeper than you drilled.

6. Once you can't push anymore, slide the head down to the neck and push it so the glue contacts both the head and body. Push and hold in place for about 30 seconds so the glue sets.

7. Use the wirecutters in the pliers to trim as much of the exposed pin as you can. A little bit will still be sticking out: Push on this proud remnant with the flat part of the pliers until the pin is completely inside the figure. You have to push pretty hard, but be careful not to damage the figure. Hold on tight near the head, and you should be fine.

8. Add a little more super glue in the hole on the top of the head. Once the super glue dries, you can apply some wood glue with a toothpick to any rough areas where the two parts of the new figure have gaps or otherwise don't quite match up.

And that's how it's done! Here's Sven confronting the Unpainted Undead, which was assembled in much the same way as described above. The light gray heads are figures from Twilight Creations' Zombies!!! game. The dark gray figures are the same Caesar Miniatures skeleton that I got the skullhead from. I may bend some of their limbs into different positions and use wood glue to make their bony limbs look a little more fleshy.

Sunday, May 19, 2013

look at some custom buildings

WWX Terrain: A look Inside, Part 2

Building Construction


After nailing down the concept art, all of the buildings were blocked out with foam core. You can see that the smaller houses on the outskirts were originally much taller. After the main buildings were fleshed out, the houses were just dominating too much space, so I cut them down a little.


From this foam core framework, all the buildings were covered with a combination of basswood strips and panels, popsicle stick planks, and styrene strips.


Saloon


Here's a before-and-after comparison of the saloon from a few different angles:


A couple buildings like the saloon, hotel, jail, and iron horse stables were built with detailed, accessible interiors. Rare earth magnets were added to the attachment points to keep the buildings together.


The roof lifts off, for a nice view of the stairwell and balcony.

The saloon was built with a doubled floor so it could be used for miniature photography with camera angles facing either the stairs or the doors.  The way that it opens up makes me think of it as a gamer's version of a Polly Pocket dollhouse!


The neon sign is 16-gauge floral wire, bent into shape. The support is made from styrene I-beams. I plan to revisit the neon lights with a painting tutorial in a future post.


The shingles on the roof are panels that I sculpted and resin-cast.

The lights are the top halves of metal model railroad lampposts. The domes of the lights are plastic beads, super glued in place.

The bottom halves of the lamp posts were repurposed into the red lights on the porch. The milk can is made from the tip of a marker, with a plastic hole punch glued on top for the lid. The same beads used for the lights were pinned to the top of the railings.

The saloon doors are on working hinges, and swing open.


The other doors are built from basswood strips with rivet-punched styrene kick plates. The doorknobs are sculpted and resin cast. For the other buildings, I created complete doors and resin cast copies.

All of the windows are plastic model railroad windows. Each was fit into the wall, and styrene framing and sills were added to the interior. Only the open buildings got the full window treatment. The others have the windows glues over the blacked-out foam core.


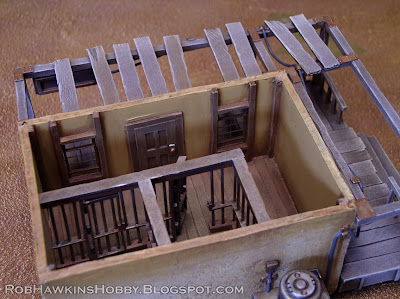
Jail


You never know when a jailbreak scenario might be in order, so I build the jail with a complete interior. The walls are covered with Elmer's Wood Filler putty, and sanded smooth. This creates a nice, pockmarked surface that resembles an adobe building

There are two cells, with bars made from thick floral wire pushed through styrene strips with basswood at the top and bottom.

It might be difficult to see in the photo, but that's a tiny space heater outside the cells.

Hotel


The hotel features the mass-produced doors I mentioned earlier, and some neon signs. The chimneys on the roof are resin cast, and the conical chimney top was used to make the lamp over the balcony.

The roof lifts off and the floors stack atop one another.

The floors and walls were painted before gluing the T-shaped insert into place.

Iron Horse Stables 


Most of the tech for this building is on the inside. It's an old horse stable that's been converted into a bike workshop.

The shingles are the same resin cast panels that I used on the saloon.

The shelves were made from sheet styrens and resin cast. I used them for the front of the metalsmith's shop, as well. All of the parts on the shelves were extra bits that I had left over from the generator construction. The cables on the floor are from the iron horse tethers, cast separately and glued in place prior to painting.


I hope you've enjoyed this look inside the buildings of the Wild West Exodus table. I'll be adding detail shots of all the buildings to my terrain gallery as I get them processed. Keep an eye on the gallery updates to see when they're added. If you follow me on Twitter or Facebook, I'll be announcing the updates there, as well