Saturday, November 17, 2012

good molding making

Making Moulds

Hi everyone!
Well, todayI wanted to share with you the way i make my moulds. There’s nothing secret here, I started making my first moulds around 4 years ago (maybe 5), making my first commission from an italian website, more a bunch of idiots actually, named TSTModellismo. They were so unprofessional that they changed idea during the making of this piece, leaving me with my unfinished piece. I was young, and the piece was quite modest, but it wasn’t really demotivating for a 16-years-old boy.
Ok, well. After this (well I’ve a website, at least i can take some satisfaction!), let’s start with the tutorial:
What i’m telling you here is nothing revolutionary. I started from the Hirst Harts tutorial, as many did, and i just made my own experience. I discovered that some problems are a real issue, and other don’t.
About the silicon:
The silicon I used are GLS50 from Prochima and BL30 from Anichità Belsito. While the first one has an amazing level of detail (all the matt surfaces will remain so, and any texture will be transposed) the other is much more cheap, and faster to vulcanize.
Anyway, working with silicon is quite annoying, the liquid is dense and sticky, and if you touch it you have to spend some time cleaning. And it happens every time. The good thing (expecially for gls50) is that it is a real fluid: you can pour it, and it will infiltrate everywhere, until all the spots will be covered. So the main deal is to mix it properly.
Materials:
Every material is ok for a mould. Expecially if you use the “slow” silicon rubbers, every kind of material will work properly. All the rough or porous  surfaces will be filled with silicon, and when removing the master everything will be ok.
Well, maybe not everything: all the weak materials will most likely break when removed from the silicon rubber. But don’t worry: the first cast you’ll make will be your new master. It happened to me many times: I had to make a new master, after a long use of the previous one, and i simply used a first cast for it. Of course, the more you will wait, more defect you will find on the new mould!
Shapes:
If there are whide undercuts, you should need to shake and to mix with some sticks around to avoid air bubbles in the silicon (which means the same difect in all the resin pieces! That’s annoying!), but if you pay attention to the shape of the sculpted thing, there will be no troubles.

Now, let’s start with the Step to Step!
First of all, I have to find a decent sculpting piece.
Here i took some columns, a roof piece, a barrel, some metal rods, and two window frames.

For the hulk I use some poliplat. It is quite an interesting material, and maybe it is a waste using it for that purpose. But i have it, and i like to work only with PVA glue, so I prefer to use it instead of cardboard or other systems!

But I had a little amount of it, that day. So I cutted it in half: There’s no difference in the moulding process, since the inner part is flat!

Here’s an example in a closer view. Some Quantum Mechanics in the background.

And that’s a group view.

Now: pouring the silicon! It is approx 150 g of GLS50 (around 45 euros per Kg), with a 5% of T30 catalyzer. You’ve to mix it properly to avoid unreacting areas. It happens, and it means 1-2 weeks more for the hardening. It sucks.

Once mixed, I just have to pour it. It is quite heavy, but it will fit in every creek and hole!

Here is a final Shot: After 24 hours for the complete vulcanization (they say much less, but i prefere to wait properly) the pieces are finally ready! Then i casted some plaster and resin pieces… near each one you can see the copy. I suggest you to click on the image for a better view…

Conclusions:
Using moulds totally changed my life (modelling life). The time you invest making one piece should be decuplicated, since it will be reproduced with a minimum effort. On the other hand, i’ve been captured by the temptation, and now i just sculpt for the sculpting’s sake. When i make somethink i immediately mould it, and i don’t use my time for my projects, instead i make new moulds for no purposes. That’s a curse! =)
Joking apart, the point of view when you are capable of using moulds will change A LOT. And the quality of the produts as well.
Cheers,

Saturday, November 3, 2012

Gladiator Helmet: Step-by-step


Here's my promised step-by-step guide on how I sculpted my gladiator helmet.

1: I started off sculpting this basic shape out of one piece of green stuff. I carefully pinched at the bottom to draw out the neck guard, from which, after the gs had cured some, I cut the notch in the middle where the two halves of the face plate came together. The eye holes were made with a pointed clay pusher tool, and the seem in the middle was etched with a needle, all while the gs was still fresh. (Not, if you want eye holes with clean, sharp edges, you can wait until the gs cures, and then drill out the holes with a pen vise.

2: To make the front half of the brim, I laid down a small roll of gs across the top of the mask.

3: First I blended the top half of the newly laid roll into the crown of the helmet ...

4: ... Then, using my fingers (wetted with a bit of water), I gently pinched the middle and bottom half of the roll into the brim's shape, while trying to keep it even around the front. Note- You do NOT need to actually "pull" the gs into the brim shape; the act of pinching it will provide enough "pull" to get the shape you need.
At this point, you can keep the brim level around the front, or you can pull down the sides a bit for a curved or other-shaped helmet.

5: Once the front half of the brim has cured, do the same with the back half. Lay down a roll of gs ...

6: ... Blend it into the top of the helmet ...

7: ... Then pinch it into a brim shape, making necessary adjustments here and there to keep the brim even all the way around.

8: I cut the crest out of a piece of cured gs and glued it to the helmet (dry-fit it first). If you have a gap where the helmet and the crest meet, you can use a touch of gs to fill it in.

This should be all the helmet you need, but you can go further, adding a horse hair crest (I'll add one on this helmet once I've put the helmet on a body), or some engraving around the helmet. There's a couple ways you might try the engraving (that I have yet to try); You can lay a thin layer of gs over the areas to be engraved and then either use the press-mold technique or grab a need;e and actually draw whatever images or designs you want on your helmet.

MAKING TRENCH SCENERY


Since I like my scenery to be incredibly durable and easy to store, I had to come up with my own way to make trench scenery that didn't rely on styrofoam and cardboard. As it turns out, even sturdy trenches are easier than you might think, as trenches are pretty messy  by their nature, and thus  forgiving of quick work.  The techniques described below can also be used to make rivers, sumps, mines, catacombs,  junk piles,  even ship wrecks!
Back to Trench Scenery
Back to the How-To Pages


TOOLS AND MATERIALS LIST
        
CONCRETE PATCH   works like filler, but it is more grainy and thick, and has actual concrete in it.  This stuff is incredibly strong!!! You can even use it to glue stuff together (messy but strong).   It's  not chalky like most fillers.  It also sticks to almost anything, if you dab at it long enough.  I've even rubbed it over smooth porcelain to get some texture on it.  (thanks to Cory for this find).
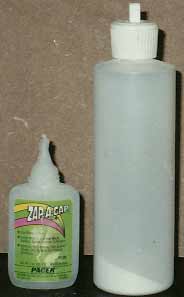
CA GLUE (aka superglue, crazy glue).  My favorite brand is Zap-A-Gap, available in hobby shops.  And whenever using CA glue, be sure to have a squeeze bottle of BAKING SODA handy (available at the supermarket).  once you have put the CA glue on, squeeze the bottle to blow baking soda dust onto it- this cures the glue quickly, and helps fill gaps!  Do this in layers to build up a massively strong bond across any gaps between pieces you want to glue together...
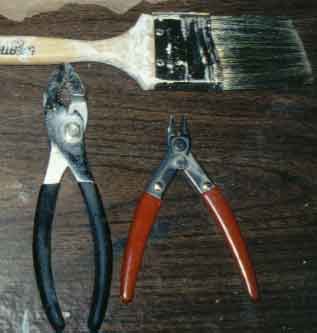
PLIERS Get yourself a big, chunky pair of pliers with nice wide teeth.  These are useful for breaking up your fiberboard into manageable, natural looking chunks.  They are also good for bending metal (like that hard-as-steel perforated scrap metal you found).
NIPPY CUTTERS (also known as diagonal cutters, clippers, hobby cutters). No great model builder is without a pair of these- great for trimming plastic, and also good for adding battle damage to plastic and wood pieces!  I got mine cheap at Radio Shack (electronics supply shop known for cheap components).
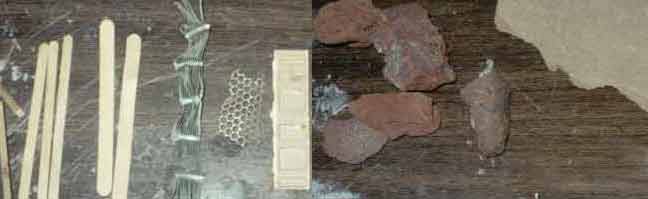
WOODEN STICKS All manner of sticks can be used-  popsicle sticks and coffee stir sticks (for floor boarding and fence posts), toothpicks (for spikes or real fine floorboarding).  Popsicle sticks are also good for applying filler- you can get a big box of 'em cheap at most crafts shops. 
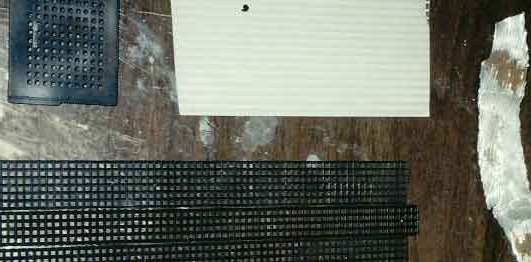
CORRUGATED, PERFORATED, OR REINFORCED SHEETS   Metal or plastic are fine (though plastic is easier to work with).  I found some perforated metal (metal with holes in it) in a metal recycling center down the road (lucky me).    I also found that some miniatures bases look good for reinforced metal- and the old Milton Bradley Battlemasters infantry stands look awesome on the bottom!
GARDEN ROCKS You can use any kind of rock, really, but those artificially made, red volcanic looking garden rocks work great!   They are light, strong, and have a great texture that paints up well.  You can get these in some Hardware/ DIY shops, and most garden / landscaping shops, or just steal some from your neighbor's front yard when they aren't looking.
FIBERBOARD (a.k.a. hardboard, press board, masonite, HDF board).   Most hardware / DIY stores sell this stuff cheap.  Get the 1/8" thickness, as it is plenty sturdy and easier to work with than the heavier stuff.  You can pick up a 4' x 8' sheet at Orchard Supply Hardware for about 3 bucks.  Pegboard can also be used, though you have to hide the holes so it's a bit more work and not quite as strong. 
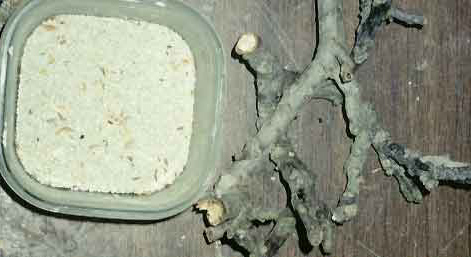
MORE WOOD I found some great looking tree branches in the park, perfect for dead tree stumps.
CROSS STITCH GRID (aka "granny grating", cross stitch cloth).  This looks like plastic grid, slightly waxy and flexible.  It comes in a variety of colors, so try to find black or brown if you can.  Be sure to sand both sides so it glues better and holds paint.
CORRUGATED PLASTIC, METAL I  found some plastic window blinds (the vertical kind) that have ridged detail on them, perfect for representing corrugated metal!  You can use corrugated cardboard (packing material, craft shops)  or scored plastic (hobby shops) too.   I got some soft, corrugated aluminum from an auto junk yard (part of a hose or something).
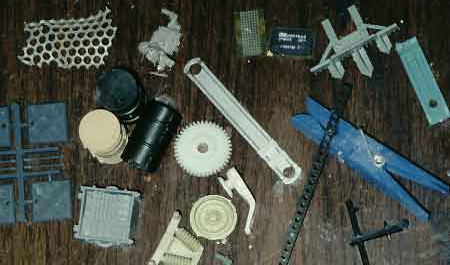
BATTLEFIELD ACCESSORIES and DEBRIS The Drums, crates, and tank traps sold by GW on sprues is perfect.  You can also use wooden drums, wooden crates, and all manner of battlefield debris (empty .22 shells for artillery shells, parts from tank model kits, bits of metal or plastic from other projects, etc.)  Also, be sure to scour toy and discount stores for army toys that might have cool accessories (I found some great barbed wire pieces in a very cheap army play set).  Even plastic sprue can be used for barbed wire fence posts, wreckage, I-beams, tank traps, etc.   Even the old Epic bases with the round holes in them look great as reinforcing plates.
STEP 1- THE BASE
First, cut or snap off a chunk of fiberboard (I like to start with pieces about 2' square).  Take your pliers and grab an edge or corner, then bend upward to snap off some of the fiberboard at the edge.  Continue along the edges, taking bigger or smaller "bites" out of the fiberboard to make a  rough, irregular shape.  This should produce a ragged edge that looks WAY more natural than a round cut or (heaven forbid) a perfect square!
Next, grab a pen (permanent markers or sharpies work great) and draw out rough lines for how you want to run your trenches.  Remember to make your trenches AT LEAST 1" wide- when you start putting in wall details, the trench width can shrink, so I usually leave at least an inch and a half of space when drawing them out.  Typically trenches are straight lines (easier to build) that zig zag back and forth in crazy angles, so be creative when drawing your lines!  Curves look good too, but are much harder to make.
Now get your Concrete Patch  handy and grab some of those rocks.  Spreat some concrete patch onto  the bottom of a rock, then press it down onto the fiberboard to glue it in place. If the rocks are really irregular, just use more concrete patch  to make sure it forms a good bond.  If you put too much on or it will squish out over the sides- just wipe away the excess   Glue the rocks along in a short row on both sides of your planned "trench", and anywhere else on your base that you want to raise up.  Avoid gluing rocks too close to the edge of your base unless you want a "cliff" edge.  Try gluing rocks in a circle to form a mud pit or crater!
STEP 2- FORMING AND LINING THE TRENCH
Now you need to build up the inside walls of the trench itself.  You can make the wall and floors out of whatever you like- heck, even mix your materials up for a really random look!   If you have perforated or corrugated metal, cut it with tin snips or a hacksaw into strips as wide as your trench.  Then cut lengths to match your drawn out trench layout and glue them to the press board with CA glue or Concrete Patch.  You can also make wood floors by cutting or snapping lengths of popsicle stick or other wood to match the width of your trench and running them crosswise along the trench floor.  Glue them down with concrete patch or CA glue.  For the walls, use the same materials as for the floor, but glue them to the rocks along your trench with concrete patch.  Don't worry if there are massive gaps on the outside- as long as the inside matches up with the floor, you'll be fine.  You may need to glue some wood "brackets" to the base and your walls to the brackets if your rocks don't run close enough to the floor...   Be sure to keep an unpainted miniature handy to check scale- you can make sure the trench is wide enough for a 1" base, and high enough to provide cover (but not so high that you can't see over the edge, unless that's what you want!).  You can also form trenches quickly by using U-channel or something like it the right size.  A friend of mine used HO train cars with the bottoms ripped out, turned upside down and glued into place!  These are just wide and high enough to form a trench when glued end to end.  Once your walls are up, you may want to go back and add more rocks to fill in some of the big blank spaces.  When you're happy with the basic layout, LET THE CONCRETE PATCH DRY OVERNIGHT.   It's probably past your bedtime anyway!
(At this point, I have to admit that I cheated when I made my trenches- I used some of the Armorcast Terraform trench pieces, and glued them directly to my base with concrete patch.  This is much faster than forming your own trench, but not as chaotically cool  looking, and a lot  more expensive.  HOWEVER, I still used all of the construction methods to make the trenches look more real and deep, like they had been cut out of the ground, rather than perfectly formed on top of the table).
STEP 3- SUNKEN DEBRIS Okay, your concrete patch is completely dry, right?  Now grab those battlefield accessories, wreckage, bits of scrap metal, I beam,  and anything else you want to be partially submerged in dirt.  Use CA glue or concrete patch to glue it to the base, to rocks, or to your wall sections.  I recommend gluing to some of the shorter rocks- that way, you're sure it will stick up high enough to avoid being completely buried.  This is a fun time to add a skeleton or zombie body somewhere on your piece...  
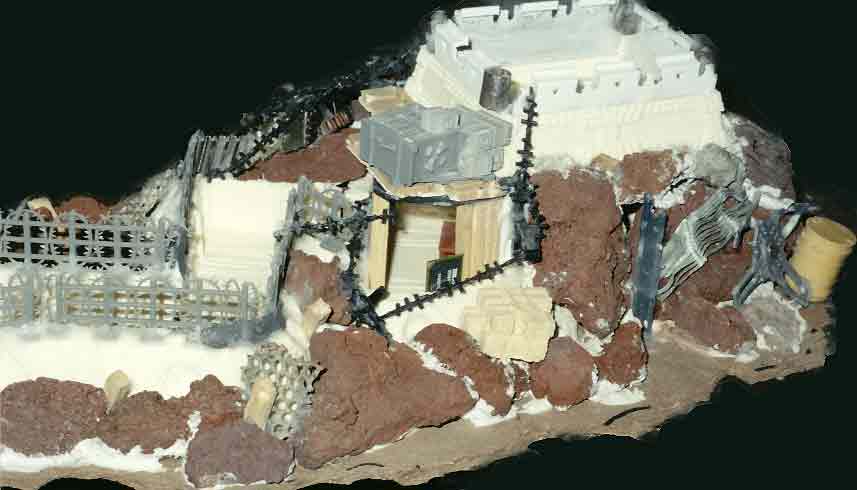
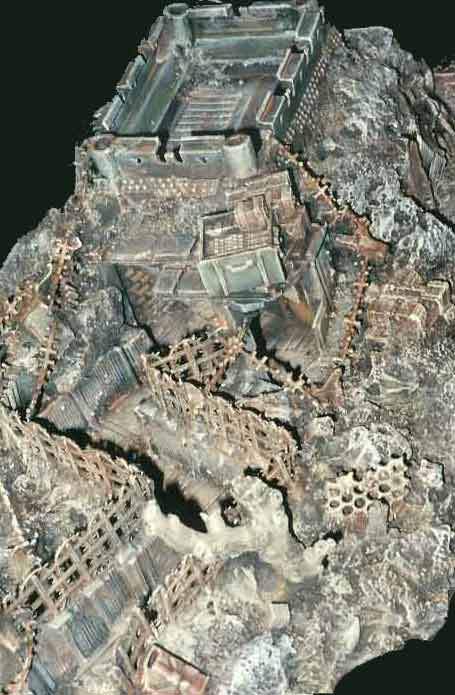
poor guy!  At this point, your piece may look something like this:

STEP 4- FILLING IN THE DIRT
Time for- you guessed it- more Concrete Patch!  Grab a popsicle stick (or your finger) and scoop out a big blob.  Use another popsicle stick (or your finger) to scrape it into the gaps between your rocks.  You can tap it, scrape it, or mash it with your finger to get it to coat all the gaps.  Don't be afraid to get some up on the edges of your debris, and go right up to the edge of your trench walls to make them look as deep as possible.  Try dabbing at the concrete patch with a stick (or your finger) to form irregular shapes in the surface so it isn't glass smooth.  You can even dab some into any exposed floor areas of your trench to represent mud or dirt!   Leave as much of your rocks exposed as you like- you can have jutting crags or completely cover them over.  Once dry, it's a good idea to rub your finger or a stiff brush over the concrete patch to brush off any loose chunks.
 
 
STEP 5- SURFACE DEBRIS
Like step 3, only now you're gluing items right to the top of the dirt.  The concrete patch should be good and strong, so you can CA glue right to it.  Try to glue pieces resting in a natural state- ammo crates and oil drums can't magically stick to the side of a steep slope; they'd more likely slide down until they caught on something!  You can also glue plates of perf metal on, bent to fit over rocks, edges, etc.   This is also the time to install barbed wire if you want.  I like to use pieces of sprue for the posts.  Drill some holes for your posts first, and CA glue them into the holes.  Now for the quick and chunky method of making barbed wire...  Get a pair of scissors and some of that cross stitch grid.  Cut straight along a grid line, so that the cross lines leave behind little stubs or "barbs"  sticking out along the edge.  Now cut along the other edge of the line to get the same effect (it will look like a bunch of capital I's stacked on top of each other if you've done it right).  Now glue one end to your first post with CA glue (baking soda helps form a good bond)- wrap it around the post once if you need to get a better bond.  Now start twisting the strand lengthwise- the "barbs" should form a spiral pattern down the length.  Keep twisting until the barbs look almost randomly distributed.  Now wrap once around the next post, glue, and start twisting again, etc. until you have run out of line.  You can double back or run double strands for extra nasty looking barbed wire.
 
STEP 6- PRIMING
Before you prime, it's a good idea to rub the whole piece down with a stiff brush or your hand.  This will remove any loose concrete patch that didn't  bond.  You'll be surprised how little comes off!   Now start spraying the piece- I recommend using flat black primer.  Be sure to get a good coat on- check the piece from all directions, as most of your materials are light colored and will look bad if they aren't primed over.  For a bit more color depth before you start painting, hit the piece with just a hint of rust red primer.  Don't overdo the rust- you'll get plenty of color on there when you start painting!  Yes, it's time to let the piece dry overnight again.  Now for the paint- you can get results like this below very quickly with drybrushing...
STEP 7- PAINTING If you don't have a LARGE drybrush yet, now's a good time to get one.  Try discount stores and look for cheap, made-in-China style brushes.  Get one with a head at least 1" wide, and cut the bristles down to about 3/4" long or until they are good and stiff.  Now you just drybrush on the colors in layers!  Here's how I usually work:
Dark Brown- drybrush over everything.
Rust- brush onto wood components (floorboards, crates, etc).
Grey- Drybrush onto exposed rocks
Tan- Drybrush over everything but metal, rocks
Olive green- drybrush over metal ammo crates and other military hardware
Rust- mix up a wash for all metal components
Steel, Brass- drybrush over barbed wire and other metal components
Light Brown- drybrush over select areas of dirt to add color depth
White- a final drybrush of white to catch highlights on rocks, dirt, wood, even metal
If some areas came out too light, I usually hit them with a dark brown wash, but otherwise you're done!
STEP 9 - WATER (optional)
At this point, you can add clear cast resin or layers of clear laquer to any craters, mud pools, etc. that you want to make "wet".  This really adds depth to the piece!  Make sure the areas to be filled are painted dark at the bottom, gradually lightening up to the sides.  You can read more about clear cast resin on the Docks page...

Step-by-Step: Cryx Bloat Thrall


Yes, yes, I know...there was no Bloat Thrall on my "to do" list when I got back from vacation. However, over the past week, I booked into GenCon in August, and registered for several Warmachine events. One of them is a 50-pointer, and when I put some lists together I realized I could probably use a Bloat Thrall. 
So, since I'm probably going to need one anyway, why not do it right away and whip up a tutorial? OK...so first off, the assembled model. This went together very quickly, the casting was clean, and I quickly realized that the sculp is fantastic. So much deep relief and plenty of chunky detail...great for painting.

The only problem I ran into were the gaps along both sides of the assembled model.


Liquid green stuff filled these in short order.


At this time, I went ahead and did the base. The figure pretty much hides the complete base, so nothing fancy here. Sand and glue.


Followed by some quick paint, drybrushing and static grass. This was then set aside as work continued on the main model.


OK, started with a spray of white primer.


Followed by the dark wash (as always, this is a mix of Future floor wax, black and brown paint, and some matt medium to flatten the finish).

Now on to base colors to block out the main parts of the figure. The flesh is Moldy Skin covered with patches of Khaki Shadow. The metal pieces are based in Blackened Steel. Brass starts with some Foundry Brazen. Rubber gets...Dark Rubber. The leather hood starts with Russet Brown and the goo in the cannon nozzle is painted in Gnarls Green from P3.

This is just a block painting pass. As you can see, the base coat application is very light and watered down. There will be several layers of paint on the figure, so keep the paint thin to prevent clogging up detail.


Then the entire figure is washed with Sepia Shade.


I started with the leather hood. You can see the progression of colors here, using a set of Reaper browns. The final highlight was done with a Foundry pale brown which is from a German camouflage color set.


The metal is quite simply done with some Chainmail drybrushed over the Reaper base. I didn't spend too much time on the metal, because I knew I was going to heavily stress it with rust paints later.


The brass fittings get Foundry Gold over the Brazen base. They are also highlighted with Chainmail.


Hoses next. Vallejo has a nice dual set of rubber colors, which I use on lots of models.


Finally, it was time to address the skin. This is the main showcase of the Bloat Thrall, so this is where I spent most of the time on the model. I wanted the skin to look distressed and ropey, so there was plenty of brushwork involved. This was done with Moldy Skin and Bloodless Skin.


Next, bruising, infection and irritation...mmmmm. I dug out the great Citadel purple wash and applied that first for bruises. Next, Red Shade went into all the stitching. Finally, Umber Shade was liberally applied randomly over the surface. As you can see in the photo, all these washes made the figure quite dark. I then went back over the model with Moldy Skin to bring the highlights back. You can see this effect in later photos.


Time to distress the metal. I used four shades of rust, watering them down in a pallet. To each pot, I added a few drops of rubbing alcohol. This breaks the surface tension of the washes, and lets the rust colors run into seems and settle nicely on the model.


I started with the darkest rust color and moved up to the lightest. I then went back over the metal with a dark wash and just ran it into crevasses to make the metal areas pop out appropriately.


OK, time for goo. I used P3 paints for this and just worked up the greens to an off-white dot highlight. The model was then sprayed flat, and the goo got some Future floor wax for a glossy finish.


And that's it.


This type of treatment makes for a pretty convincing undead horror.


 Dirty, rotting and mildly bloody. Well, on that note...


'Til next time

Tutorial: Painting Horses, 28mm


Continuing on with some Middle-earth figures this week...and I thought it might be a good idea to publish a step-by-step for painting horses for those who are interested in the subject.
So, starting out with the Valiant Rohirrim box...

We find that there are 18 cavalry figures in here. But only two different horse sculpts. What!?! So I'm going to end up with 9 horses with heads up and 9 horses with heads down. That's ridiculous. Now, having said that, the horse sculpts you do get are excellent. They are two very beautiful models.

I'm painting these guys up for my Middle-earth game, so I thought I'd go to the internet to get some source material. Looking at Hasufel, the Chestnut ridden by Aragorn in this pic, and Arod, the Grey ridden by Legolas, I decided to use these two for the inspiration for the pair of models I was going to do for this tutorial.

Another Grey. This one is Snowmane...Theodin's horse.

And Aragorn on Hasufel again.

There are a number of color variations for Chestnuts and Greys (as well as any other type of horse), so I used a couple of other photos for guidelines. Another Grey here. Notice the dark legs and nose.

And a Chestnut glamor shot. I liked this one because it showed off some nice white socks.

Well, with source material sorted out, I started into contruction. These are just two-piece figures, and they went together without any trouble. There was a slight seam between the two halves, so I busted out the great new liquid green stuff filler from GW. You know, GW puts out a lot of hobby crap. A lot of over-priced hobby crap in most instances. However, I have to say that the new liquid green stuff is magic in a jar.
OK...primed white.

Black wash. As always, this defines the detail on the figure and gets some base line shading in.

Base coats. I'm using Foundry's Arctic Grey set on the Grey horse, and Chestnut for the...Chestnut. The base coat is put down very thin.

Some darker shading next. I'm using Vallejo washes most of the time now. This is a great new product line. The Grey gets a wash of black, and I also added a little black paint to the wash to do the legs. I washed the Chestnut with a mix of Umber and Fleshtone. I think the challenge with a Chestnut, which is essentially a mono-color horse, is to get a convincing tone of paint. Mixing these two washes helped achieve that (I hope).

I darkened up the Grey's mane and tail, and then when on to highlighting. The muscle articulation on the sculpts was subtle, but very nice. I just used the sculpt as a guideline for laying down the highlights, which were painted on as fairly light glazes. Just a few passes each. The Grey gets the mid-tone Arctic Grey and then a little White. The Chestnut just gets the mid-tone Chestnut paint. I didn't go any lighter, because the second paint in this set is light enough for the color I was looking for.

OK, with the coat colors down, I went in and did the hooves (Rawhide for the Chestnut). I also did the socks on the Chestnut, starting with grey and then highlighting in white. There isn't a lot of tack on these horses. Just the armored head piece, some leather straps, a saddle blanket and the saddle. Didn't pay too much attention here, since the rider figure covers most of the saddle. Finally did the base as well, and that's it. Two horses from Middle-earth (or New Zealand, or where ever).

Popped on the riders, and Bob's your uncle.

Hope you found this tutorial useful. If you have suggestions for how I can make posts more useful for you, just send a note.