
It's a scale model of an elevated roadway intersection made by model the Illinois Department Of Transporation (IDOT), and it measures about 3.5 feet square. I won it before realizing that I didn't have room for it in my car! Luckily Pat was able to drive it home for me.
It appears to be approximately HO scale (20mm in size) and it's constructed entirely of plastic and plexiglass with a rather impressive internal support system.
I decided to turn it into an urban wasteland board -- and, of course, I've blogged the whole process, from start to finish. My main goal was simply a game board that had enough texture and color to be interesting, but nothing that would inhibit the placement of terrain. We've amassed quite a collection of individually based scenic items (as opposed to the modular terrain tiles that other players enjoy), so I had to leave room to place these features all over the board.
Though it's a bit unique to start a project like this using a professionally produced architectural model, the how-to detailed below can be applied to any urban wargaming board. I've included a few notes as to where the process would be a bit different if starting from scratch.
Supplies needed
- Light gray house paint
- Dark gray house paint
- Paint texture ( I like "Sheetrock Sand Finish Paint Additive")
- A few Mason jars for paint mixing
- Craft paints in brown, tan and ivory
- Black wash (in this case made from water, black paint, and a touch of dish soap)
- Masking tape
- Rustoleum Aged Iron textured spray paint
- Thin plastic card
- Scissors
- One-inch or 1.25-inch square paper punch (optional, but extremely useful
- Tack2y glue (a thick but inexpensive PVA that you can find at your local craft store
- Extra fine point permanent marker.
- Clear matte spray varnish
I got the board home and discovered that after taking out 10 screws, the bridge section was removable. I took off the bridge section and set it aside for a future project (watch for an upcoming blog post). That left me with this.

At this point I was able to examine the handiwork of the board's creators, who had even added nicely defined curbs and a slightly lowered street elevation! I masked off the edges of the board and inspected the street. It was already painted light grey and had traffic markings on it.

If building your own board, mask off the street areas and paint them with light gray house paint, then paint on any markings. I didn't want to entirely cover up the the nice street markings, so I got the can of Rustoleum Aged Iron textured spray and took a light pass over the road surfaces. Be careful, as this product comes out of the can really fast.

I put it on a bit heavier than I would have liked, but you can still see the road markings. And as you can see, it adds a nice, uneven texture and color in one step.
Now for the sidewalks. You can cut out squares yourself if you have access to a square hole punch, but they're expensive at $12 to $20 each. I borrowed this Paper Shapers 1-1/4 Inch Nesting Punch from my wife's scrap-booking supplies and punched out about 70 squares of thin card.

To get the most squares out of each sheet of card, turn the bottom of the punch towards you, otherwise it's very hard to see where the cut is happening and you end up wasting a lot of paper.

My sidewalks were mostly curved, so I after laying them out I had to cut angles in the sides so they would all fit together. No real reason to measure though, just eye it and cut.

I glued them down with a 2:1 mixture of Tacky Glue (thick PVA from the craft store) and water that I painted right onto the board. The edges of the card sections will curve up when you glue them. Simply let the glue sit a couple of minutes and go back and push the edges down a few times. A pair of popsicle sticks is great for pushing the edges down without getting your fingers stuck to the card sections. Make sure to leave cracks between all the sections and feel free to have a lot of broken sidewalk sections -- this is an urban battlefield, after all!
When the sidewalks were dry, I gave them a coat of light gray flat house paint (don't get satin or eggshell). Sidenote: I recommend house paint for large sections of terrain. It's is sturdy, available in any color and most hardware superstores have a brand that is available for less than $10 a gallon! Just so you know: even though in-store displays show color tabs for specific brands and grades of paint, any color can be mixed in any brand/grade of paint. I went to Menards and picked my colors of paint from the Philadelphia Grand Distinction ($24 per gallon) display, but had them mixed into the $8.99 a gallon Lucite brand. If you have a favorite shade of model paint, just bring in a swatch on a piece of white paper and they'll match it for you.
Now it's time to cover all the remaining areas of ground with a coat of textured dark gray paint. Making textured paint is a cinch. You can go old school and mix in sand, but I recommend the "Sheetrock Sand Finish Paint Additive".

It's a nice ground pumice that stays mixed better than sand and only costs $1.50 a pint (16 ounces in volume, but marked 8 ounces in weight). I mix batches of this in the glass jars that pasta sauce comes in, which are nicely marked in 2 ounce increments.

For a nice rough texture, I use 4 ounces of additive and 16 ounces of paint. Note that after adding the additive, the level of the paint will not raise much as pumice is extremely porous and sucks up the paint.
When you've got your textured paint ready, apply it to all areas of ground.

If you want a more worn and battered look, you can paint some textured paint areas overlapping the sidewalk. I didn't do much of this, but it's up to you. While the textured paint is drying, take your extra fine tip permanent maker and trace the breaks and cracks between the sidewalk sections. Then give the sidewalks a nice liberal black wash.
Then it's time to dry brush. I used only light gray housepaint for the main four corners, as they were areas that would have been built-up with buildings and such.
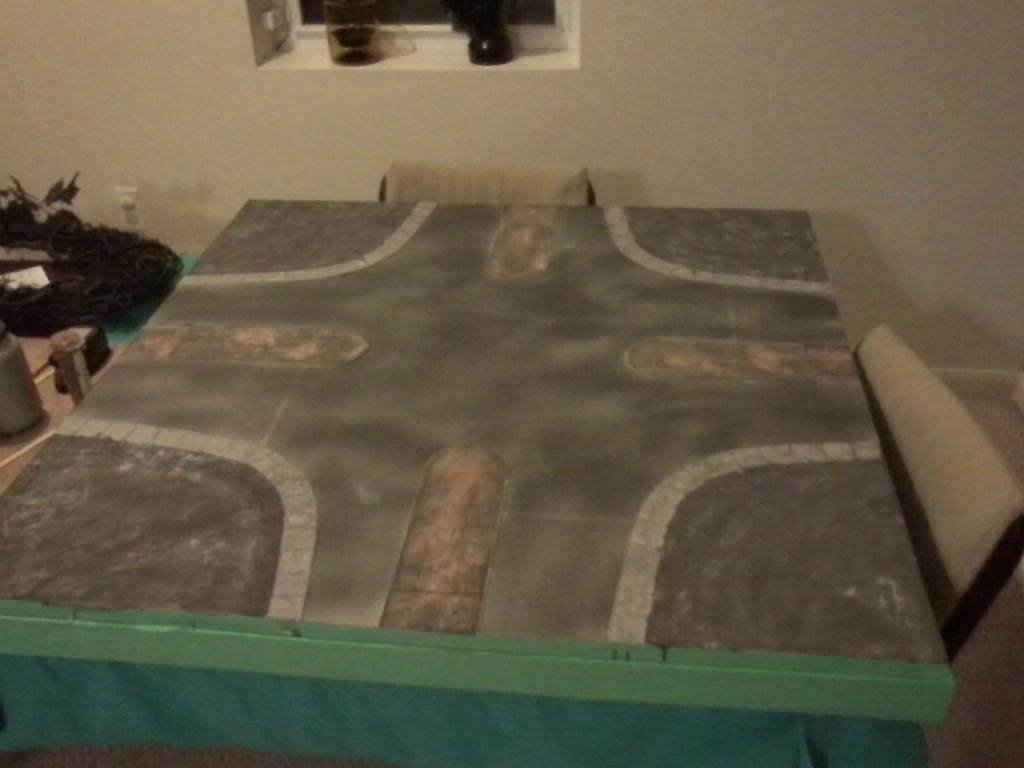
For the medians, I figured they would have at one time been landscaped, so to represent the scorched soil I painted on a few large brown blotches, then drybrushed on tan, followed by ivory.

Then I did just a bit more light grey drybrushing, touching up areas of the curbs that had been accidentally over-painted and a few spots of street that came out a bit darker than I wanted.

The final step was simply a quick coat of matte clear spray varnish (I used Rustoleum) for a bit of protection. Then I hauled it into the sunlight for a picture of the finished product.

Here's what the board looks like with minis some 28mm Hazmat figs from Lead Bones (sold by Recreational Conflict) and a couple of 1:43 scale cars from Road Signature by Yat Ming.


Sidenote: I really like these cars. They scale well with 28mm figures, though at $6 they're about twice as much as cheaper models I've used in my conversions. They are well-detailed and have much nicer wheels than cheaper models. I found them at Menards this week. I recommend getting there quick if you like them, as they tend to go fast.

I'm pretty happy with the results here. It's a nice-looking board without much to inhibit the placement of terrain. It should serve well for sci-fi and post-apocalyptic games. It was quick to make, and though the board doesn't have a lot of color, the differing textures between the areas of dirt, street and sidewalk provide suitable contrast. The median sections add just the right amount of color variation. In retrospect I might have instead have gone with a very dark brown texture paint rather than dark gray, but I was influenced by the relentlessly gray boards of Warhammer 40k Cityfight, so that's what I did.
Lastly, though the sidewalks are pretty clearly 28mm, it's even possible that this board could be used for smaller scales such as the 10mm sci-fi games that we occasionally play. As always, please leave a comment if you have any questions!
No comments:
Post a Comment