How to paint faces – Tutorial
Painting faces is one of the crucial parts in miniature painting
hobby. Unfortunately many people give up before even trying to master
this skill. This tutorial explains how to paint faces, but in fact it’s
much more than that. It also teaches how to use colors for shaping your
miniatures, how to create sense of depth with colors, how to make
skintones interesting, and how to play with color nuances on your
miniatures. To put it shortly: it’s a must-read for every aspiring
miniature painter.
Well, with this I believe that the subject of the faces is complete.
In this tutorial I address location of lights and shadows, midtones and
tones to heighten and to disguise volumes. In addition it’s expanded
with color palettes and tones for different surroundings, specially
focused to the four seasons.Palettes
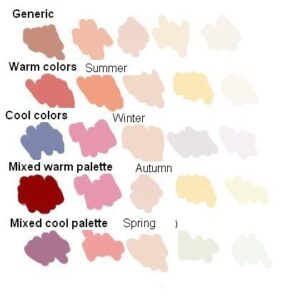
First of all, painting a face is thinking about the palette of colors that im going to use. A very common mistake between painters is to be accustomed to a mixture and to use it for all type of skins. They finish doing monotoneous and little realistic works when they paint faces in particular circustamces. This can be minis under a strong light, bronzed by the sun or when trying to represent figures of different ethnic groups in the same diorama.In the picture below it’s possible to observe some palettes that I have created for the occasion. One is a generic palette of brown neutral, very similar to the one I use for base colors, accompanied by other four sets of tones. Two primary pallettes (Warm and Cold) and 2 mixed. The intention is that mixing the palette of generic with the suitable palette of tones we pruned to give the atmosphere that we wish to surround our miniature.
The first palette of tones is the one that we will call generic.
They are the typical flesh colors that have a neutral tone and that we will turn to warm or cold according to our chioice. Andrea’s flesh paint set, basic skintone (VMC) , brown cork, light flesh could be colors of this type.
Later we have the palette of warm colors.
This palette is the ideal to use in a summer atmosphere since the thermal sensation of its colors evokes the summer period. It uses ochre and orange colors for reddish the midtones and brown tones for the zone of shade. Flesh is illuminated as well with a yellowish color that simulates the direct solar illumination.
In the opposite side we have the palette of colds.
This palette would be adapted for a winter typical scene by the temperature of its colors. One is based on pink for midtones and blue or violet for shades. The illumination is made with a greyish color that does not warm up the lights.
So how to paint faces with these palettes?
We can see a compared example of both palettes in this digital painting recreation (miniature was only digitally painted).The mixed palettes correspond to mixtures between cold and warm colors. Indeed spring and autumn match in their intermediate temperature so we are able to use them indifferently.
The spring palette that I have taken is this:
This composing in its majority by cold colors since my intention is to intone with the intense green color of the leaves at this time. The midtones will be of a pink-orange tone and the shades will go in fucsia. The lights became a little grey applying some greenish tone to the skintone to simulate the dragged pallor of the winter.
Finally the autumn palette, that is the following one:
Composed in its majority by warm colors to intone with the leaves of fall and a cold touch that represents the temperature of the atmosphere. It uses a pink color to simulate the cheeks attacked by autumn cold. The rest of colors: ochre and brown game with the landscape of withered leaves.
Once we selected the color palette to use, there is another aspect to consider. On many occasions the “flesh” colors are colors very saturated to represent the average tones and it’s better to grey them a little to obtain a greater realism. (It is not the case of the miniature that I painted, since the gray tone is present as much in average tones as extreme.)
Here I put an example in a figure by Vincenti for you (that’s realism):
Placing highlights and shadows
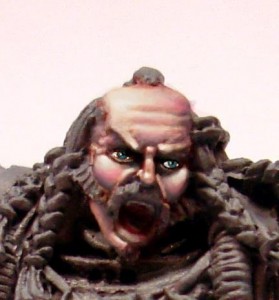
In the miniature where the positioning of lights and shades will be explained (Space Marine). I decided to grey all the face and then to heighten the volume giving tones. For the base I used the second base of the Andrea’s flesh paint set who has an intense orange brown color. I toned the color down by adding azur that is approximately the complementary color. Once applied the base it is the moment for adding the lights and the shades. Each face is different but more or less there are certain elements that all have in common. There are zones that always will be in shade and zones which always will be in light and this with some practice you will learn to see it automatically. The light focus is very advisable, for aesthetic reasons, to turn it a little to give more realism and to personalize the face. Its convenient before establishing the incidence of the light to locate the main view of the figure to adequate the light focus to that view.Once illuminated and shaded the face has a too uniform aspect to seem real (independently of the used color). By applying additional tones we will cause that the face takes realism and in addition we will be able to give depth or to heighten volumes alternating cold colors and warm colors.
Manipulating volume
The theory is that the warm colors tend to heighten a volume, to say it somehow, to push it towards outside. On the contrary the cold colors give to sensation of depth and/or concavity. If we have this in mind its easy applying glazes of cold and warm colors to heighten the reliefs of the figure. Here you have a small example.Once we learned this it’s necessary to assimilate what we have learned and not to directly associate prominent parts with warm colors and parts sunk with cold colors. The good thing of this technique is that indeed it helps us to emphasize volumes and to make hollows deeper but also allows the opposite. If we have an unwanted volume we can apply the cold tone to disguise a protuberance and the warm tone to minimize a depression.
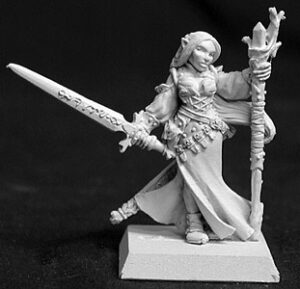
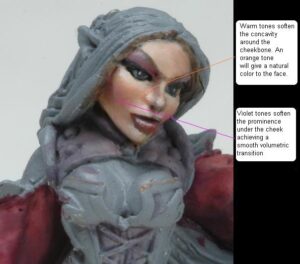
The perfect example is the figure of Lyssete, 28mm of Reaper Miniatures. It is a precious miniature that aside from having the typical Werner Klocke face has a noticeable cheekbone. I’ve selected a few photos so that you can see it for yourselves.
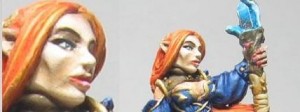
The challenge is in countering the hard gesture that has modeled the figure. In order to obtain it in this case I have used orange colors (my dear German orange) around the cheekbone, that in a normal figure would intone in cold color to mark it. Doing so I have been able to disguise a little the deep hollow that existed.
Later the challenge is in being able to disguise volume that it leaves downwards from cheekbone and that it is so ugly in a feminine face. In this case I need to “sink” the zone but I cannot use blue or green colors since probably they would give a sensation of a beard. I decided to use fucsia color to cool it. This tone does the function to me of cold tone and a similar color with the one of a feminine cheek with slight make up. Therefore using it to make up the eyelids will give me coherence to these tones.
Here you can see the result.
The mini is still unfinished but I believe that the effect can be seen. As always all the questions will be welcome and serve so that everybody understands it better.






No comments:
Post a Comment