The other day I was sitting there at the modeling desk
using a hot glue gun unsuccessfully trying to glue a piece to a wooden boat
when I put the Hot glue gun down without looking what I was doing. Next thing
I noticed that all the hot glue had dribbled out all over the workbench
effectively covering the half completed Pavla P40 cockpit I was working on.
37 choice words later I carefully started to pick at
the dried glue, thinking that the cockpit was a write off I gave the big glob
of glue a hard yank. next thing I know the glue parted ways from the resin
without damaging the parts. I was just about to flick the dried glue at the
cat in disgust when I noticed that the glue had a pretty good impression of
the P40 cockpit embedded into one side Hmmmmmm.
I've seen a few articles on Resin casting and using
Silicone or latex as a mold agent but never hot glue “glue” so this may be of
use to the budget modeler who cant get or afford those resin upgrade cockpit
sets.
Tools Needed.
Glue Gun
Glue Sticks
Small piece of Glass
Tin of Bog (Bondo)
Master of whatever you want to cast
 Well
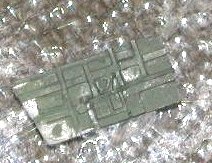
after that long winded intro here’s what I discovered. Mount your master
cockpit side in this case a Resin P40 one onto a piece of glass and cover it
with some type of release agent (I used spray on Chef aid oil). Turn on your
Hot glue gun and leave for at least 10-15 minutes until it is very HOT, If the
glue isn’t hot enough you get a lot of air bubbles in it as it comes out. Once
the gun is hot slowly cover your resin master with the glue making sure that
you go slowly and evenly over the part, paying particular care to avoid air
bubbles and making sure that you get the glue into all the
Well
after that long winded intro here’s what I discovered. Mount your master
cockpit side in this case a Resin P40 one onto a piece of glass and cover it
with some type of release agent (I used spray on Chef aid oil). Turn on your
Hot glue gun and leave for at least 10-15 minutes until it is very HOT, If the
glue isn’t hot enough you get a lot of air bubbles in it as it comes out. Once
the gun is hot slowly cover your resin master with the glue making sure that
you go slowly and evenly over the part, paying particular care to avoid air
bubbles and making sure that you get the glue into all the
 nooks.
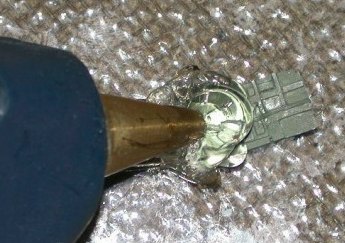
Leave to dry for about ten minutes then carefully peal
the hot glue off the resin master, if you managed to cast the glue mold
without any blemishes or air bubbles you now have a resilient but flexible
mold. The glue can hold a fair amount of fine detail, not quite as good as
resin but far better than the kit supplied parts.
Now it’s time to reproduce that cockpit panel, as this
is a low budget tip I stayed away from the expensive casting resins that are
hard to find. Instead I used common garden verity car Bog, Plastic Putty or
Bondo to our US friends, this stuff is dirt cheap and a tin can last you a
lifetime unless of course you spent a lot of time driving by feel! The tin I
have was purchased about 4 years ago and is mainly used for filling very large
holes caused by my more disastrous screw-ups, on models not the car!
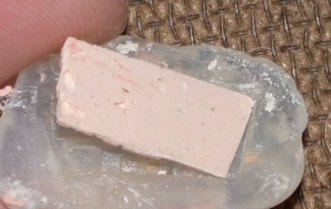 Mix
up a small amount of filler and hardener, go light on the hardener as it will
make the finished panel less brittle. work in the bog into the mold making
sure that you get all the air bubbles out again. One trick that I do is
slightly overfill the mold and then flip it right way up and push it down onto
the glass until the bog dries. The bog will not stick to the glass or the hot
glue and once dry you can carefully “pop” out the finished panel by flexing
the mold from side to side.
Mix
up a small amount of filler and hardener, go light on the hardener as it will
make the finished panel less brittle. work in the bog into the mold making
sure that you get all the air bubbles out again. One trick that I do is
slightly overfill the mold and then flip it right way up and push it down onto
the glass until the bog dries. The bog will not stick to the glass or the hot
glue and once dry you can carefully “pop” out the finished panel by flexing
the mold from side to side.
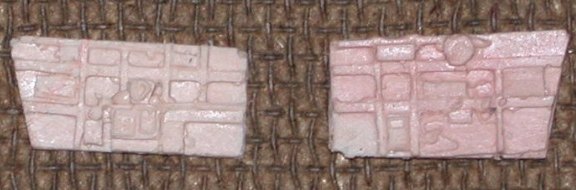
By making two molds for each side, In no time I
cranked out 25 “generic” 1/72nd scale cockpit panels in about 30
minutes as thin as the original resin ones with 98% of the detail. Remember
that the sample shown in the photo is only 18 mm long and 10 mm high and once
painted and dry brushed look as good as the original.
 Flushed
with this new found success I went Glue gun mad and in a short period of time
successfully managed to cast radial engines, control panels, radio boxes and
even wheels by doing them in two halves. I even managed to cast replacement
exhaust stacks for a Mk I Airfix Spitfire that the carpet faireys ran off
with.
Flushed
with this new found success I went Glue gun mad and in a short period of time
successfully managed to cast radial engines, control panels, radio boxes and
even wheels by doing them in two halves. I even managed to cast replacement
exhaust stacks for a Mk I Airfix Spitfire that the carpet faireys ran off
with.
As much as I support the small garage resin operators
who’s only product is the Fruitbat Mk22 cockpit panels and resin replacement
seat there are times when we can really can only afford to splashdown that
money on one set and those other 14 un-built Fruitbats sitting in the kit
dungeon are going to miss out. So here’s were this idea can work out, use the
Acme supplied cockpit panels as a guide …scratch build a master set for the
rest, make hot glue molds and knock out the other 13 in about 19 minutes.
easy!
Now this feature will only be of use to make side
panels and boxes for models, and is of no use for undercarriage legs and such,
it is still a cheap and useful way of casting those odds and ends that can
take up a long time to scratchbuild. So far I have only done 1/72nd
scale stuff but looking at the quality that the silicone glue can hold there
is no reason that you cant use it for casting more complex shapes on bigger
scales.
No comments:
Post a Comment