I haven't posted for a while. Work, the house, the garden and a holiday in Gdansk
came first. I've also been working on two model buildings. The first, a
damaged town hall type-building, was a big project to start with but
grew into a monster as it progressed. The second was a damaged apartment
block that I've run into problems with. I've taken many photos of both
projects over the last few months as they progressed but I'm not sure I
can make sense of them now so I don't know if they'll ever see the light
of day in this blog except, one day, as finished items. We shall see.
I'm taking a break from them both at the moment so, meanwhile, here's a small project that I knew I could easily finish. It's a 00 scale water tower made by Dapol that's
been in my loft for a while, and I wanted to make it suitable for my
15mm Chechen War table. I wasn't sure what to do with it for a long time
but, after wandering around some of the former industrial areas of
Gdansk, I was inspired to make it look neglected and put it on a base
that looked like concrete slabs with grass growing between the cracks.
Here's the kit more or less straight out of the packaging:

I forgot to take pictures of the initial stages! The first thing I did was take my underused rotary tool and
lightly grind away some of the plastic to make the tank look like it
had taken some knocks over the years. The legs are intended to be
painted as if they are iron but I liked the idea of them been made of
concrete, the material of choice for Soviet-era builders, so I ground
quite deeply into the legs in places to try and make it look like some
chunks had fallen off them. After grinding, I smooth any hard edges with
a file.
I moved down the wheel on the central water pipe by about 5mm to make it
a more suitable height next to 15mm miniatures. The next bit I did just
to see if it would work. I glued the pipe and a washer to a square of
plasticard...

...then filled the gaps and trimmed the square to the shape of the
washer. I then wrapped a small strip of very thin plasticard around all
of it to create a low and wide disk:

I simultaneously used polystyrene cement to hold the strip to the
plasticard disk and superglue to hold it to the washer. It wasn't
difficult to do but I couldn't find anything to hold it all together so I
ended up having to sit there with it between my fingers while I waited
for the two glues to take hold. I then levelled the top of the disk with
plaster. Why did I do it? I just thought adding a concrete moulding
would make the pipe looked more 'finished' somehow and wanted to try out
bending plasticard.
I usually add flock or sand to bases, but I tried something different
this time. Before gluing the kit to the base, I wanted to texture it by
wearing down the plastic in a similar way to what I had done with the
kit. I painted the plastic with polystryrene cement, poured fine sand
all over it then rubbed the whole lot with sandpaper before the glue
dried. It gave the smooth plastic a slightly rough finish that I think
works quite well as an imitation of concrete. I was quite pleased with
the finish and how easy it was to do so I roughened two more sheets of
plasticard on both sides, to make a few generic concrete walls with
later.
If you try this method, do so in a well-ventilated area because it
really, really stinks! Incidentally, I used a 25-year old bottle of Beatties own-label
glue that I found in a toolbox. I never realised before but the smell
is unlike any other polystyrene cement. I used this kind of glue on the
first model kit I ever attempted (a Macross Valkyrie) so it brought back
some pleasant but long-forgotten memories for me.
Anyhoo, here's the pipe in position on the centre of the base:

The textured plastic is easier to see in the centre of the image below:

I threw the kit's ladder into my box of bits because it was too large to
use on a 15mm terrain piece. The replacement ladder is made by
Plastruct. I added some sand to the base to camouflage that I cut the
original base too small and added an extra piece. Oops. I scratchbuilt
the scaffolding frame at the top of the ladder because I accidentally
cut up the original pieces for another project. Oops. I also intended to
put a wire mesh around the scaffold but I dropped the metal mesh on the
floor and it didn't turn up until after I'd declared the project
finished. Oops.

I painted the whole terrain piece a light grey, then repainted the legs
and base with a sort of dirty sandstone colour and picked out some of
the metal supports with raw umber. For weathering on the tank, water
pipe and supports, I alternated two thin washes of burnt orange and two
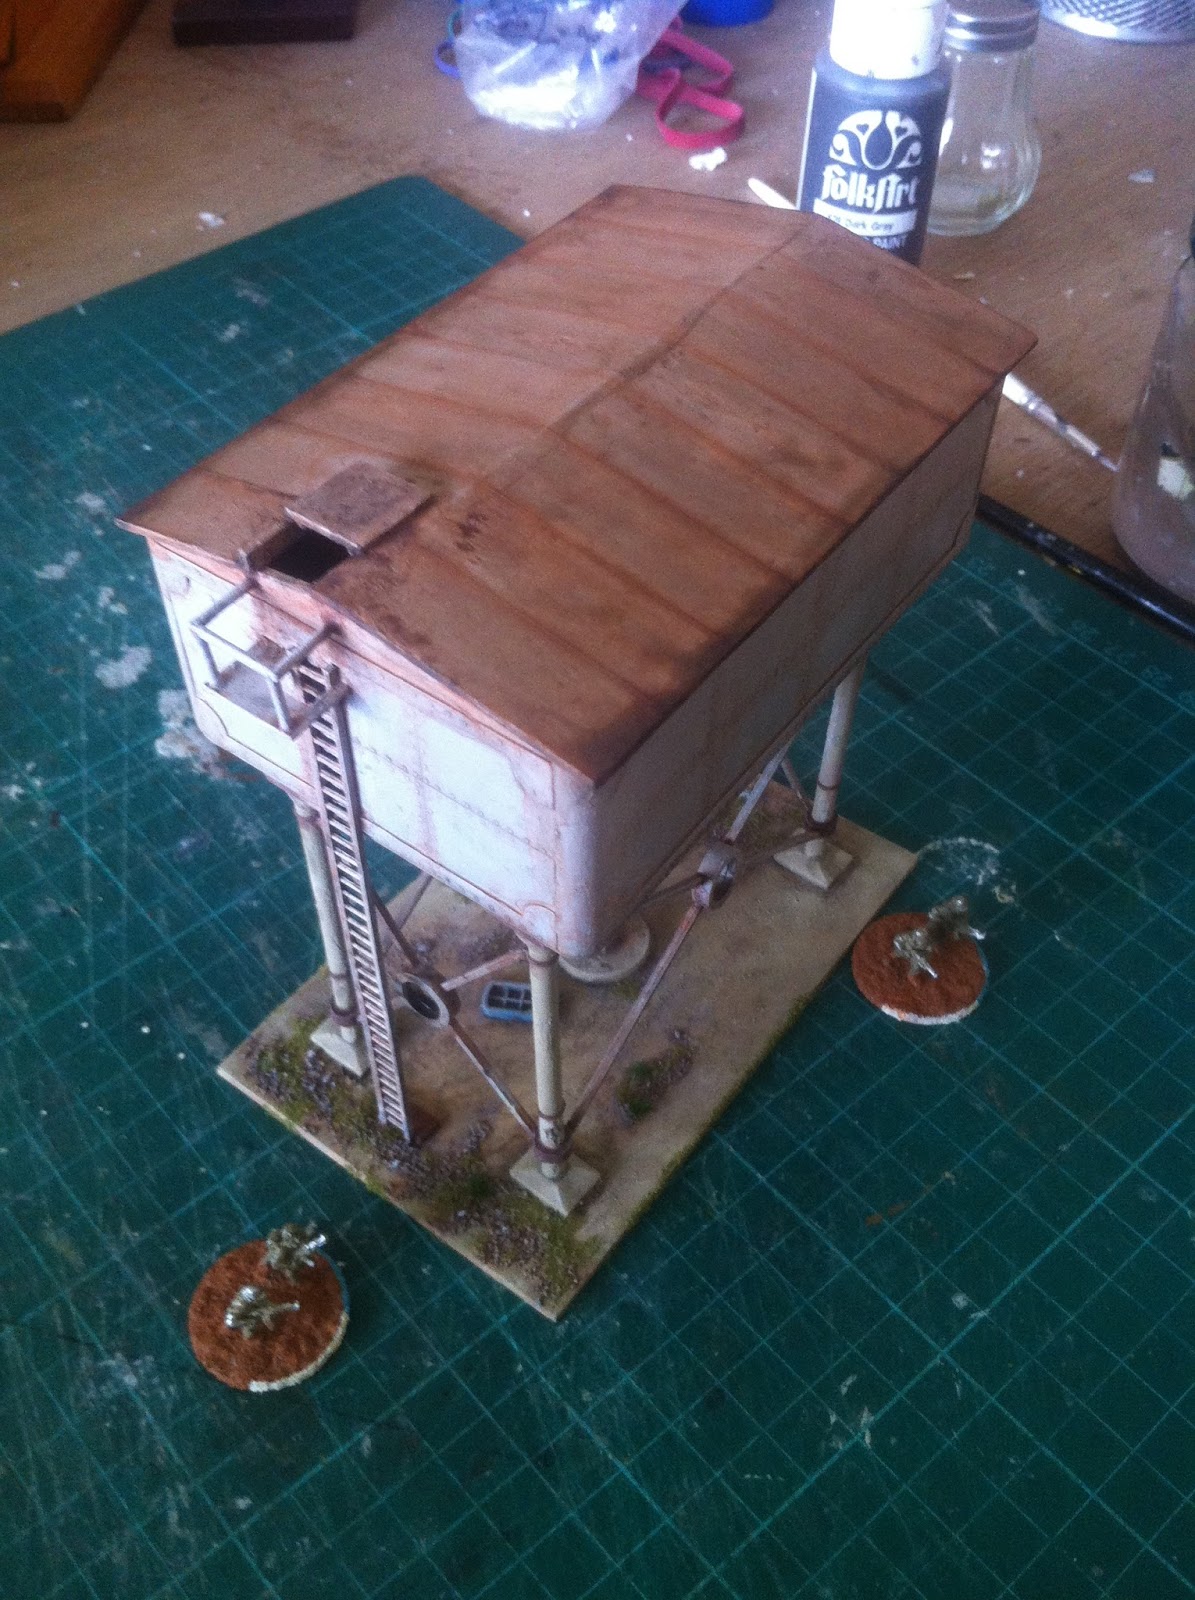
thin washes of raw umber. On the legs and base, I used FolkArt's Dark Grey craft paint. Here's the terrain piece at the halfway point:

I drybrushed a few of the rusty metal supports where the washes had pooled too much paint, added a wash of dark grey to the tank, and a few blobs of rust here and there with a smaller brush. Here's the finished terrain piece, with a stand of Old Glory 15mm Middle Eastern Regular Infantry for scale:

The flocking on the sides of the base is not very subtle. I'm hoping it will look like clumps of grass growing up against the concrete slabs when it's on the table.

A couple of views from the other side:


A wargamer's-eye view of the roof:
A close-up of the grinding work I did with the rotary tool. It's just a few minutes of work but pays off because it makes painting easier. The thin washes of paint pool in the roughened areas and make it look like I've put in rather more effort than I actually did!

More grinding work. Here, my lazy brushwork is more apparent...

A close-up of some of the grinding work on the legs. This is the end of
the base that I extended after I put the ladder in position and realised
I'd made it too short.

I did very little fine brushwork on this terrain piece. Most of it was drybrushing on the metal supports. I added some burnt orange highlights to the raw umber, and drybrushed the edges of the metalwork with light grey to pick out the details.

I'm quite pleased with this project, not least because I finished it in a couple of evenings, which is amazingly fast by my standards, and most of that time was just waiting for the washes of paint to dry. The paintwork doesn't stand up to close inspection but it will do for wargaming. I'll be applying my new quick and lazy wash painting methods to future buildings.
No comments:
Post a Comment