Making Crates
Here's
a quick tutorial on how I build crates using a block of foam, with
basswood texture glued overtop. The solid construction ensures that the
crates don't run the risk of collapsing during construction or gaming,
and the foam keeps them lightweight.

Step 1: Cutting the Foam Blocks
Begin with a section of 1-inch thick insulation foam.
Working from one of the straight, smooth ends, measure out 1-inch increments.
Then, using a snap-off knife and a steel ruler, cut the foam at your measurements.
From there, cut the long blocks into shorter segments. For smaller, flatter boxes, cut the sections in half lengthwise.
Step 2: Coating the Blocks
Use
something to hold the block (I've stuck a half-round file into the
bottom of it) and apply some Liquid Nails on each surface. Wet your
finger and smooth the Liquid Nails over the entire surface. The water
will help keep the adhesive from sticking to your finger, but be sure to
thoroughly wash your hands with soap and water afterward.
Coating
each block this way will allow you to super glue the basswood right to
the surface. Why not just stick the wood on using Liquid Nails, you ask?
Well, the Liquid Nails takes a little while to dry, and the pieces will
slide around. The moisture in the L.N. will also cause the wood to curl
slightly.
Super
glue alone will eat into the foam without really adhering the wood, and
hot glue also runs the risk of melting the foam without creating a
secure bond. This is my preferred method for attaching things to foam.
Step 3: Attaching the Wooden Planks
This
is where the real work begins. To cover the foam, use basswood. Most
hobby shops carry a variety of shapes and sizes, and the pre-scored
sheets are perfect, much easier than gluing individual strips. Get the
sheet with 1/4-inch planks. You'll also need some 1/8-inch styrene
strips (they'll come in later). Each of these is 1/16-inch thick.
Begin by cutting the panel into three one-inch sections, using the grooves as your cutting guide.
Next, cut the long strips into one-inch squares.
Super glue these squares to the ends of the crate.
For
smaller crates (like I mentioned above), you can remove sections of the
square to fit the height of the crate. If you keep things measured in
quarter inches, you can easily use the grooves on the wood as your
cutting guide. These two crates are 1/2-inch and 3/4-inch high.
The
strips to cover the long sides of the crate need to overlap the wood on
the ends, so use the crate to measure out where to cut the panel.
Cut four pieces (one for each side) and super glue them to the crate.
Because
the foam is cut to exactly one inch, and the wood is also one inch
wide, there will be a slight gap on each corner. To take care of this,
cut some thin wooden "runners" from the spare basswood. These runners
don't have to be terribly precise, merely cut them around 1'16-inch
wide. (I just eyeballed it.)
Trim the runners to the length of each crate. Then run a bead of super glue in the gap and place the runner into it.
Now you have a neatly framed out wooden crate.
Step 4: Building the Metal Straps
Metal
straps can be created using the 1/8-inch styrene strips mentioned
above. Lay the crate on its side, and mark the crate's width and where
the rivet will fall in the center of each plank.
You
can make easy rivets using a rotary hand sewing punch. This tool
(intended for leather working) will press a divot in ove side of the
plastic, leaving a raised bump (our rivet) on the opposite side. Cut the
strip and super glue it to the crate about 1/4-inch from the end.
Repeat this to make four vertical strips and then measure the top strip so it overlaps the ones on the side.
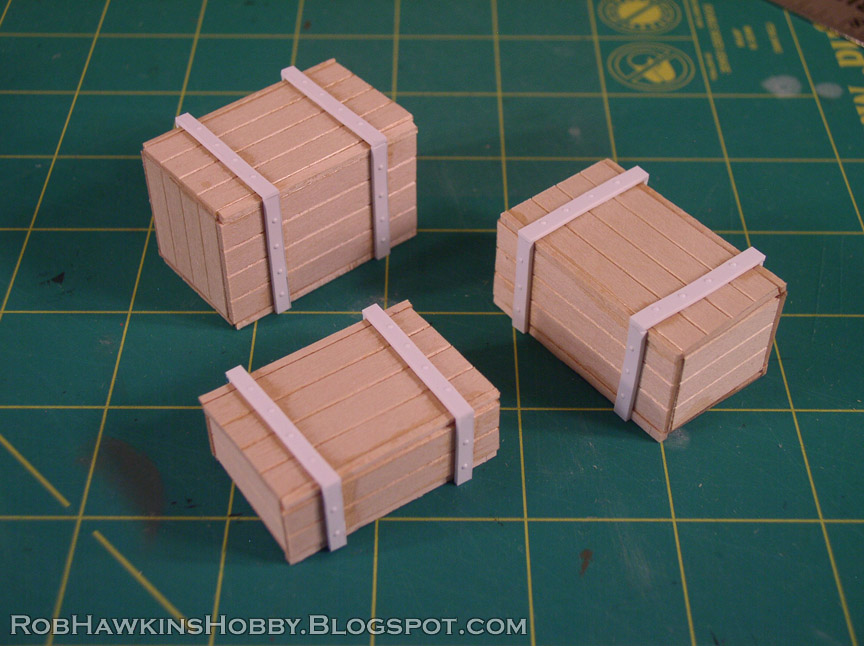
There
you have it– A wooden crate with metal straps. Because these crates
will be glued down on some terrain, I've left the straps off of the
bottom so they will sit flat. If your crates will be loose pieces for
your battlefield, you can build the straps all the way around and paint
all the sides so the crates can be positioned or stacked anywhere.
To add a bit of weathering, use your hobby knife to make some V-cuts between the planks.
Now
you can build a pile of cargo for your game table. Perfect for adding
detail to factory and shipyard settings, and useful for taking cover
from an enemy model's fire!
'Til next time!


No comments:
Post a Comment