Realistic Rust Effects: |
Here's a tutorial on painting, or more correctly, "applying" realistic-looking rust effects in weathering the appearance of a painted miniature. For the sake of efficiency I'll be using work-in-progress shots of a Privateer Press Cryx Deathripper, which I was intending from the outset to weather and corrode but who marks my first attempt at these kinds of effects on a wholesale level. What follows here is me feeling my way blindly along through an attempt at rusting effects, and the final end result - which I think turn out having a very corroded, oxidized appearance.
WARNING: When combined, the ingredients in the following Rust Mixture produce a small amount of poisonous chlorine gas as a byproduct of the chemical reaction which "creates" the actual rust. For your own safety, prepare the mixture in a well-ventilated area and allow the reaction to subside completely (several days in my case) before handling or using it!
  |
On the left is Ye Olde Bottle o' Rust Mixture and on the right is an example of the rust mixture, some PVA glue, and my general acrylic paint thinner mixture (including dry time extender!) dried in a palette well - several coats were applied over a day or so.
|
The essential heart of this "natural" weathering technique is the Rust Mixture itself. This was a recipe I learned many, many, many years ago in a middle school chemistry class - it does involve some mildly harmful chemicals, an initial chemical reaction producing small amounts of chlorine gas as a by-product, and possible adverse affects to skin, clothing, or oxidixable metal if spilled. Consider yourself warned! The Rust Mixture is as follows:
I used a standard empty Vallejo dropper paint bottle with the steel wool placed inside prior to pouring the mixture of the two liquids in. While not an intense chemical reaction, the initial interaction of the ingredients produces a small amount of chlorine gas as a by-product - leave the top off your mixing container in a well-ventilated area to allow this to dissapate! I found out the hard way about not leaving the screw-top off the dropper bottle until the reaction subsided completely, as when I first opened it I was spattered with "pressurized" Rust Mixture. I am by no means a chemistry major, but I believe the bleach and vinegar as potential caustic agents cease to be a problem once all their reactions are completed on the steel wool, likewise any production of chlorine gas; for safety's sake, you may want to wear nitrile (household cleaning) gloves in case of spills on the chance any bleach or vinegar remain active in the bottle past the initial chemical reactions.
Being made up of actual oxidized metal, the Rust Mixture has a tendency to settle - prior to using it as a paint make sure the bottle is well-shaken. While I can't say this is an ideal mixture for painting with, as it takes some getting used to and behaves much differently from acrylic paint, I can safely say it's likely the most authentic rust mixture I've seen used on any miniature figures thus far, given that it is genuine rust in a bottle!
|
Here is the test subject - one gently used Cryx Deathripper figure. A coat of Testor's Dull Cote was applied shortly after this picture was taken, and the subsequent pictures have a noticeably more subdued appearance to the metals and armor plates - all rusting aside, of course!
|

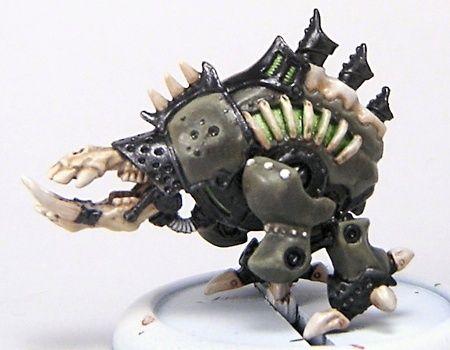
This picture shows the dried results after several thinned-down washes of the Rust Mixture at 1:10 Mixture/thinner consistency were applied to the crevices and underside areas of the figure where corrosion would realistically collect, and have been allowed to flow and pool naturally through gravity and surface tension. One thing of interest I found is that my Rust Mixture reacts negatively with Liquitex Slow-Dri Blending Fluid Medium and becomes somewhat "chunky" on the palette. Of course, this also worked in favor of the figure, as it gave the appearance of significant collected rust ingrained into the upper crevices.
|
This picture shows the dried results after several thinned-down 1:1 washes of the Rust Mixture and GW Bestial Brown at 1:10 paint/thinner consistency were applied again allowed to flow and pool naturally through gravity and surface tension. While obviously realistic, the standalone dried Rust Mixture had more of a "yellowy" tint to it, and I felt that the overall appearance of the corrosion needed a hint more of orange and brown shades to it.
|
| Back to Tutorials |

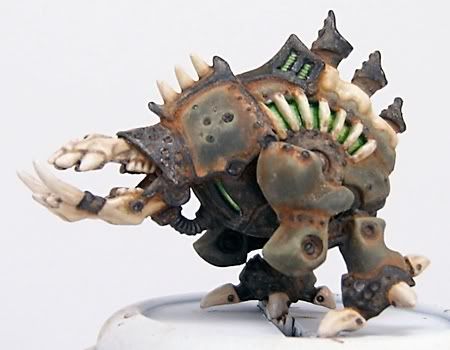
This final picture shows the results after careful lining-in with 1:8 GW Brown Ink/thinner. I felt that the deepest shading in the crevices between the trim and ceramic armor, and between adjoining metal sections (like the rivets/studs on the legs) needed slightly more definition. I also applied some general washes of Tamiya Smoke in certain areas, such as the holes/venting in the cowl over the skull and the "vent holes" on the metal plating of the Deathripper's legs.
|
Pictures of the finished figure with attached base can be found
|
No comments:
Post a Comment