Showing posts with label Terrain. Show all posts
Thursday, October 25, 2012
Making a Dark Eldar webway portal

Since the GW webway portals can be hard to come by, I decided to try my hand at making a Dark Eldar webway portal at the prompting of Mr. Esty from Enter the Nurgling.
...These have to be easy to recreate at home on our own, no? Isn't it just a painted dome?
What do you think of doing a tutorial, or a how-to-make your own article?
It just seemed like something you'd be good at (I've never tried painting any lightning FX myself before).

Image from Games Workshop
Well, he's right, they aren't too hard to make it turns out. While you could pick up the GW version (or you may already have it since it bears a striking resemblance to another well known template) there is always the option of making your own version.
So I set out to see what I could do.

The first step was finding a suitable "thing" that I could use to make the actual template. I had a rough idea of what I was looking for and it only took me a day to find it. Turns out, an official plastic Wiffle ball is just a couple millimeters short of 3 inches (the width of the GW version I'm told). Half of the Wiffle ball has holes in it and the other half is solid... guess which half we need for our project.
Now you purists might balk at the very slight size difference, but I think for most people, this won't be an issue at all.
In addition to the Wiffle Ball, you're going to need a few other things to pull this off.
X-Acto blade
Hobby file(optional)
Spray paint (Black, White and two colors that match your army)
White paint and detail brush
Clear Gloss finish (optional)
Gloves (to protect your hands during painting)
Once you have everything, it should only take about a half hour (including dry time) to make one. And I'm sure you can always make a couple of these at once as well to cut down on your time. So let's get to it then.


Getting it cut in half was easy to do. Since the ball is plastic, it's easy enough to follow the seam around the middle of the ball with an X-Acto knife and cut it right in half. Some cleaning up around the edge and you've got your template. Now there is the issue of the molded text on the ball.
While the text is small and not very obvious, it still has to go. We can't have that junk on there. This can be CAREFULLY shaved off with your X-Acto blade (hold it sideways) and then use a bit of a scraping (similar to cleaning mold lines) once you have the majority of the text cleared away. This concludes the construction portion of the tutorial.
With your "template" ready to go, it's time to get to painting.
This is where the gloves come in, so you don't end up spray painting your hands while you're working.

NOTE: I picked two colors I thought looked cool. You can use Black, White and any two colors that suit you and match your army. You obviously don't have to use the two blues that I chose here. The important part is that you get two colors... one light and one dark. And I use the cheap spray paint too.

First we prime the thing black. Make sure to let this dry completely before moving on. I told you we would need gloves.

Once you have it primed, it's time to do the real painting. You may want to try a few practice runs on some cardboard lying around just so you aren't surprised and you get the effect/shape you're looking for when you go to paint the real thing.
The picture above breaks the template down into three areas.
It also goes in order... A,B and then C.
A: Where you paint the highlight using your lighter color. Just a quick spray or two like you see in the picture.
B: The area where you paint all the way around the template with your darker color. The idea is to help blend the lower portion of your light area into the black at the bottom.
NOTE: You may want to go back with your lighter color after step B and put a tiny highlight back on the template. You can go back and forth between A and B until you have the look you want. Just make sure to let each step dry completely before spraying.
C: The bottom where you add the black. You actually paint just below the template (hence the gloves) and let just a little bit of the spray cover the very bottom edge of the template. The idea is to get black at the bottom without covering too much of your work on top.
With these three steps done, set it aside to dry before adding the lightning.
Adding the lightning is done in two parts.
1. Get your white spray paint and a scrap of cardboard (remember that piece you used to test out your patterns on?) and make yourself a puddle of white paint. Quickly take your gloved finger and get some paint on it and then flick your finger at your template.
Once again, you might want to practice this a couple times before the real thing to make sure you get the right amount and pattern you want.
With everything completely dry, take your regular white paint and a detail brush and go in and add a variety of squiggly lines radiating out from some of your larger drops of white paint. This will make the lightning look like it's concentrated in some areas and not in others. Add lightning "bolts" until you have the desired effect.

Give it a quick gloss varnish and you're all set. I chose the gloss over flat so the piece would stand out on the tabletop a little better. It will most likely be the only high gloss piece on the table and that will help better represent the ethereal warp like quality it should have.
You can see how it looks compared to a regular 25mm based marine there.
All in all, a fairly easy process with some good results. And even better is the fact that you can use colors to make it match your own army.
While it looks like I just threw this together real quick and it came out great looking, it took me a number of attempts (read at least a dozen) to get it this way. If you're going to try this, please do yourself a favor and do a few trial runs on the side of a box or something before putting any paint on your template.
Sofa so good
My
attempts at card modelling have, to say the least, been less than
inspiring. I, like many others I suspect, was seduced into attempting it
by the modelling expertise of others (I'm looking at you Vampifan).
The photograph on the right shows a typical box-type structure that is
meant to represent a sofe (settee ?). Unfortunately it is typical of my
attempts at card modelling - an abomination of something, but quite what
remains unknown.Continuing on from using my bits of scrap left over from my current builds, I've again utilised the scraps of cork and a few bits of foam-board left of from my urban terrain build.
The photograph shows all the necessary pieces make some chairs and sofas with.
The dimensions for the sofas vary, depending on the number of seating spacess, but they are basically the same for all seating. Five pieces make up each piece of furniture; a back; two arm-rests, a base and the seating.
All the cork pieces are about 4mm-5mm thick.
The base is 10mm x 15mm (per "seat"), on top of that is a piece 10mm x 15mm approx. - (and again, per "seat").The arms are approximately 15mm square, whilst the back is about 20mm tall, 15mm per "seat" long with an additional 5mm added to each end to allow for the arms-rests.
When assembled the first few prototypes looked like this:I was very happy with the results and from the above photograph I'm sure you can make out my attempts at making a few different styles.
Altogether I had enough bits of cork left to make eighteen sofas (from two to four seat capacity and around about twenty chairs.(You can just make out the black painted ones in the background)
The photograph above left shows the first coat of paints applied to them (actually two coats, as cork soaks up paint like nobody's business). When they've thoroughly dried out, I'll be giving them a dark wash and then some high lighting Some will be given a matt varnish, to represent fabric, whilst others will be given a gloss varnish to represent leather.

Finally just to show the comparison between my homemade sofa and my wreck of an attempt at a card one:
Well, that's it for this week, I hope you find something here ot interest you and as usual, all comments are welcomed and appreciated.
Scrap Scenery
The photograph to the left shows the matchsticks in their original form, then two glued together, then two sets of two glued together. These make the central supports for the palettes.
In the photograph above you can see the black plastic ones that came with the fork-lift (from Tesco's). I couldn't really decide which size I preferred so I made several different sizes, there is after all no standard size for a pallette.
The photograph on the right show a Foundry figure on a couple of palettes for scale purpose (he's barely visible in the first photo); the fork-lift seat shows what a close match for scale it is.
This photo shows five piles of "bricks" that I made in about an hour. They are merely four pieces of 5mm foamboard (from the windows of the tenements I'm making), glued together then scored into 1cm x 5mm x 5mm "bricks". - a huge size for actual bricks, but perfectly acceptable for my wargaming purposes. The colour of these appears to be very red, but they are meant to represent new bricks - they will be toned down and matt-varnished
All those scraps of coffee-stirrers that I have an abundance of were also put to use to make this pile of planks. This was a very simple case of gluing the sticks in a rough stack. The inside of the stack is actually hollow and would have shown the rounded ends of the sticks facing the insides. I'll probably put a paint wash over this (eventually) but it isn't at the top of my to-do list .The piece, whilst not completely finished, is sufficient to be used in its present state.
The final photograph shows both of the above pieces for comparison purposes.

All of these pieces can easily be used together in a variety of situations, a builders yard, a demolition site or a building site for example; all of course proving that essential cover for our miniatures.
I'll take this opportunity to welcome my two newest followers Dave VanDam and Captain Richard, I hope that you find something here to interest you.
That's all for this week, thanks for taking the time to look and as always comments are both welcomed and appreciated.
Crate Progress
As will be obvious, it's nothing fancy, merely some crates really crudely stuck together.
I made no attempt at squaring them off nor did I make any attempt at accurate measurements for them. Most measurements being done by eye.
This intial batch was made primarily from lollipop stiicks, some of which are of the actual used variety, whilst others were bought many years ago for the princely sum of 67p (for 100 sticks). The sticks are about 100mm long (excluding the rounded ends) and about 10mm wide. In addition to the loolipop sticks I've also used those ubiquitous coffee stirrers.
This second batch of crates uses the coffee stirrers solely.
They're made in exactly the same fashion as the ones above and easier to make as the stirrers are thinner than the lolly sticks and consequently easier to cut.
In the future, if I make any more of these crates then I'll be sticking to the coffee stirrer variety.
Here's a photograph of the two varieties of crate side by side .
There is of course a very practical point for making these models, in that not only do they provide cover for our heroes but they also add to the scenic aspect of our games.
I've purposely left these crates loose so that they can be utilised in more situations and as can be seen in the photographs a two-high barricade of them can appear very substantial.
There is also another aspect to these that is not apparent from the other photographs and that is that, not only are they hollow but they also have a side missing.
I had the idea that once a box was opened it could be turned over to reveal what was inside - it was one of those thoughts that made sense at the time.
They can still be used as an indication of a crate having been searched though.
Currently in the pipeline:- Operation DFS Winter bed-sale is almost complete and should be blogged about next week; more Urban Road terrain has been started; my cottages ar3e currently having roof tiles added (individual tiles - they're no fun at all); work on my tenements has continued, but very slowly and I made a building during the England game this week (yes, I was that bored) - I would have had it finished too if the match hadn't picked up a bit in the second half.
Well, that's all for this week, comments, as always, are both welcomed and appreciated.
Finally, to those I haven't already welcomed to my blog - "Welcome!" - (that would be aimed at my two new followers, Chris and Kris) I hope that you find something of interest here.
Vic's Gaff
![]() | |
|
The building came about whilst I was watching the England v San Marino football game (it was a really boring first half) and I designed, drew out and cut out the whole thing by the start of the second half. (The second half was better and therefore work stopped on the model.)
I wanted a feature on each of the four walls, so this side has a window in it .
The model itself is made of a fairly thin card frame to which has been added some thin crimped card.
I didn't want to risk my newly purloined crimper with the thicker card that I used for the shell of the building
The effect I wanted was that of corrugated iron sheets, so they were all cut to a uniform size (about 50mm x 30mm) and applied to the model.
This does have an advantage in that it makes the model slightly stronger with the extra additional layer.
The rear of the building has a high window as its feature.
The frames for all the windows, door and the upper part of the rear of the building are made from the ubiquitous wooden coffee stirrers.
Both the windows in this model have been "glazed" with clear plastic. (I wouldn't want Van Fampi on my case now would I ?)
The final side of the building showing the side door. (yep, boring. - I know)
The roof was made in exactly the same way as the main shell of the building, card then thin corrugated card on top, but it does have the addition of another thin sheet of card along the ridge; this is meant to represent roofing felt (possibly also known as tar-paper, but don't quote me on it.)
It appears as a fairly uniform grey in the photos, but I blame the crap cameraman for that. It is actually several different shades of grey and has a texture too, created by a small amount of wall filler
Another three-quarter view of the building showing that the doors are openable.
The doors are made from - yes, you guessed it - coffee stirrers.
Overall approximate dimensions are
Base: 75mm x 125mm
Height to roof: 50mm
Height to roof ridge: 85mm
I also reinforced the internal corners of the model (coffee stirrers yet again).

Here are two views of the inside of the building.
I had decided early on that I wanted the whole building to appear fairly run-down, both inside and outside, so the inside got a similar treatment to the outside.
None of the walls were actually fully painted in any particular colour, but as i used paints for one thing or another, whatever was left on the brush was wiped off on the inside walls.
The inspiration for a lot of the inside detail came from Zombietown (http://www.skankgame.com/zombietown.html), the sire where I really started my venture into zombie wargaming, even though I was looking for ideas for my then gangster project.
The stains on the floor and the accumulated muck in the corners (dust from filing cork) all add to the overall "lived-in" look.
This next view shows many of the bits and pieces that I used to detail Vic's Gaff.
The workbench is four pieces of card (top, two sides and a shelf).
The shelf has a piece of piping on it, which was cut from a skewer I had used to stir some silver paint with (god know when). On the bench is a book, a newspaper and some "gentleman's reading material", scratch built or left-overs from Nipper's Newstand (March 2012's blog, as is the poster above the bench.
The shelf on the back wall was a piece of card on which there is a box (scrap card) a couple of cylinders, representing rusting paint-tins and some wire mesh which I've used in the past for leaded windows. Underneath the shelf are three more slightly larger cylinders painted in red and yellow (a colour scheme I've seen used on cooking oil in my local cash and carry!) No doubt anyone familiar with WWG products will recognise their tool-box. Not shown in this photo, but fairly visible in a photo above is a sack I scratch built.
There's not much going on in the other end of the building, a broom and a few bits of wood on the side shown, another tyre and new piece of corrugation are on the other on the other side, they can be seen in one of the photographs above. The brush was inspired by Sid the Sweeper (the foundry figure I've used a lot for scale purposes) and like so many other things it's probably well overscale. It was made from a small piece of cork and a cocktail stick.
Even with the vehicle in though you can see that there is still room left for figures to fit in, especially as I use 20mm bases (pennies or washers).
In the back of my pick-up truck are some of the sacks, which I scratch built after making the experimental one for this model.
Designing, cutting out, painting, making props and everything else that went into this model probably took no more than five or six hours total, but was spread over six days, so about an hour a day.
That's it for another week then and as always comments are both welcomed and appreciated.
I'll also take this opportunity to welcome my latest follower - "Dark_Jober" to my blog, I hope he and all you others that peruse this site find something to interest or entertain you.
Making an Urban Wargaming Table
It's a scale model of an elevated roadway intersection made by model the Illinois Department Of Transporation (IDOT), and it measures about 3.5 feet square. I won it before realizing that I didn't have room for it in my car! Luckily Pat was able to drive it home for me.
It appears to be approximately HO scale (20mm in size) and it's constructed entirely of plastic and plexiglass with a rather impressive internal support system.
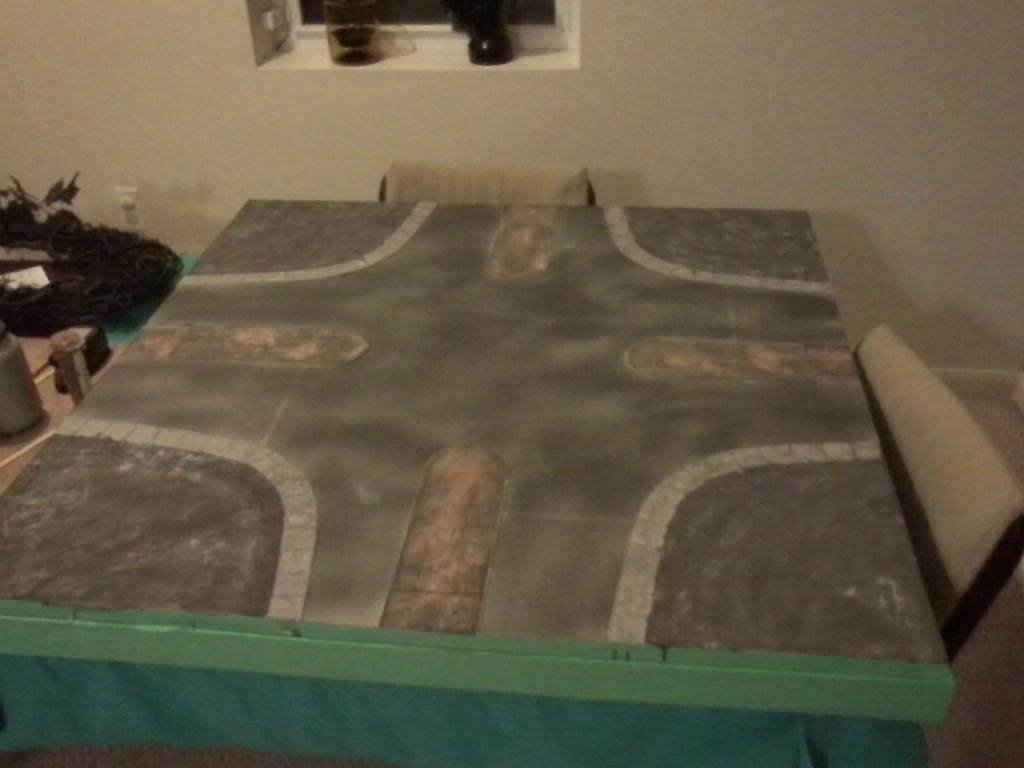
I decided to turn it into an urban wasteland board -- and, of course, I've blogged the whole process, from start to finish. My main goal was simply a game board that had enough texture and color to be interesting, but nothing that would inhibit the placement of terrain. We've amassed quite a collection of individually based scenic items (as opposed to the modular terrain tiles that other players enjoy), so I had to leave room to place these features all over the board.
Though it's a bit unique to start a project like this using a professionally produced architectural model, the how-to detailed below can be applied to any urban wargaming board. I've included a few notes as to where the process would be a bit different if starting from scratch.
Supplies needed
- Light gray house paint
- Dark gray house paint
- Paint texture ( I like "Sheetrock Sand Finish Paint Additive")
- A few Mason jars for paint mixing
- Craft paints in brown, tan and ivory
- Black wash (in this case made from water, black paint, and a touch of dish soap)
- Masking tape
- Rustoleum Aged Iron textured spray paint
- Thin plastic card
- Scissors
- One-inch or 1.25-inch square paper punch (optional, but extremely useful
- Tack2y glue (a thick but inexpensive PVA that you can find at your local craft store
- Extra fine point permanent marker.
- Clear matte spray varnish
I got the board home and discovered that after taking out 10 screws, the bridge section was removable. I took off the bridge section and set it aside for a future project (watch for an upcoming blog post). That left me with this.
At this point I was able to examine the handiwork of the board's creators, who had even added nicely defined curbs and a slightly lowered street elevation! I masked off the edges of the board and inspected the street. It was already painted light grey and had traffic markings on it.
If building your own board, mask off the street areas and paint them with light gray house paint, then paint on any markings. I didn't want to entirely cover up the the nice street markings, so I got the can of Rustoleum Aged Iron textured spray and took a light pass over the road surfaces. Be careful, as this product comes out of the can really fast.
I put it on a bit heavier than I would have liked, but you can still see the road markings. And as you can see, it adds a nice, uneven texture and color in one step.
Now for the sidewalks. You can cut out squares yourself if you have access to a square hole punch, but they're expensive at $12 to $20 each. I borrowed this Paper Shapers 1-1/4 Inch Nesting Punch from my wife's scrap-booking supplies and punched out about 70 squares of thin card.
To get the most squares out of each sheet of card, turn the bottom of the punch towards you, otherwise it's very hard to see where the cut is happening and you end up wasting a lot of paper.
My sidewalks were mostly curved, so I after laying them out I had to cut angles in the sides so they would all fit together. No real reason to measure though, just eye it and cut.
I glued them down with a 2:1 mixture of Tacky Glue (thick PVA from the craft store) and water that I painted right onto the board. The edges of the card sections will curve up when you glue them. Simply let the glue sit a couple of minutes and go back and push the edges down a few times. A pair of popsicle sticks is great for pushing the edges down without getting your fingers stuck to the card sections. Make sure to leave cracks between all the sections and feel free to have a lot of broken sidewalk sections -- this is an urban battlefield, after all!
When the sidewalks were dry, I gave them a coat of light gray flat house paint (don't get satin or eggshell). Sidenote: I recommend house paint for large sections of terrain. It's is sturdy, available in any color and most hardware superstores have a brand that is available for less than $10 a gallon! Just so you know: even though in-store displays show color tabs for specific brands and grades of paint, any color can be mixed in any brand/grade of paint. I went to Menards and picked my colors of paint from the Philadelphia Grand Distinction ($24 per gallon) display, but had them mixed into the $8.99 a gallon Lucite brand. If you have a favorite shade of model paint, just bring in a swatch on a piece of white paper and they'll match it for you.
Now it's time to cover all the remaining areas of ground with a coat of textured dark gray paint. Making textured paint is a cinch. You can go old school and mix in sand, but I recommend the "Sheetrock Sand Finish Paint Additive".
It's a nice ground pumice that stays mixed better than sand and only costs $1.50 a pint (16 ounces in volume, but marked 8 ounces in weight). I mix batches of this in the glass jars that pasta sauce comes in, which are nicely marked in 2 ounce increments.
For a nice rough texture, I use 4 ounces of additive and 16 ounces of paint. Note that after adding the additive, the level of the paint will not raise much as pumice is extremely porous and sucks up the paint.
When you've got your textured paint ready, apply it to all areas of ground.
If you want a more worn and battered look, you can paint some textured paint areas overlapping the sidewalk. I didn't do much of this, but it's up to you. While the textured paint is drying, take your extra fine tip permanent maker and trace the breaks and cracks between the sidewalk sections. Then give the sidewalks a nice liberal black wash.
Then it's time to dry brush. I used only light gray housepaint for the main four corners, as they were areas that would have been built-up with buildings and such.
For the medians, I figured they would have at one time been landscaped, so to represent the scorched soil I painted on a few large brown blotches, then drybrushed on tan, followed by ivory.
Then I did just a bit more light grey drybrushing, touching up areas of the curbs that had been accidentally over-painted and a few spots of street that came out a bit darker than I wanted.
The final step was simply a quick coat of matte clear spray varnish (I used Rustoleum) for a bit of protection. Then I hauled it into the sunlight for a picture of the finished product.
Here's what the board looks like with minis some 28mm Hazmat figs from Lead Bones (sold by Recreational Conflict) and a couple of 1:43 scale cars from Road Signature by Yat Ming.
Sidenote: I really like these cars. They scale well with 28mm figures, though at $6 they're about twice as much as cheaper models I've used in my conversions. They are well-detailed and have much nicer wheels than cheaper models. I found them at Menards this week. I recommend getting there quick if you like them, as they tend to go fast.
I'm pretty happy with the results here. It's a nice-looking board without much to inhibit the placement of terrain. It should serve well for sci-fi and post-apocalyptic games. It was quick to make, and though the board doesn't have a lot of color, the differing textures between the areas of dirt, street and sidewalk provide suitable contrast. The median sections add just the right amount of color variation. In retrospect I might have instead have gone with a very dark brown texture paint rather than dark gray, but I was influenced by the relentlessly gray boards of Warhammer 40k Cityfight, so that's what I did.
Lastly, though the sidewalks are pretty clearly 28mm, it's even possible that this board could be used for smaller scales such as the 10mm sci-fi games that we occasionally play. As always, please leave a comment if you have any questions!
Subscribe to:
Posts (Atom)