Who needs a display base?
Anyway – even though there's much less time for painting I just
couldn't refuse myself playing a skirmish game once per a week or two
and
recently we've been working hard converting old Necromunda rules to make
the game more exciting.

That leads to the definitely biggest hobby of achievement of last
months which was finishing whole gang of Goliaths – based on EM4 minis. I
like
these bastardos so much I decided to give them display base so they look
nice standing in my display case, waiting for next battle. It takes
less than a day
to finish base like I made and that's what the article is about.
Please note – Chest of Colors is very friendly community so the original
text had to be slightly adjusted to be nice as well but if you want to
read
FUUK-
friendly version – just visit my
blog at Plinth Country.
What will you need?
Apart from ordinary hobby supplies try to get some plaster (or any
other filler: the cheaper – the better), photo frame or display plinth
of some
sort and if you plan to take some wip-photos – wife, girlfriend or
brother will be useful as well.
So I started by choosing photoframe – it's pretty cheap, you can buy it
in store like IKEA and it's perfect for the job. First or all I
removed glass – you can throw it away. I was also trying to mark spots
for base sockets which turned out totally useless bit later.

First of all I broke wooden frame support off the frame back.

Another step was cutting the styrofoam sheet to fit the frame –
wallpaper knife used. To get more precise cut I used hot wire thingy. I
inserted the sheet into photoframe – as you can see it fits pretty well
so we can proceed.

The bottom was glued to the frame. I used solid amount of polymer
glue to be sure it won't fall off or whatever. If you don't trust the
glue only -
hit the base with some paperclip pins.

Creating the terrain
For better minis presentation I decided to add small elevation in the
back of the display area. I plan to place 5 gangers on it and rest of
the gang – on
lower level.


Time to mark final destination of the miniatures on the display base.
To do it I simple pressed bases onto the styro – it will be helpful
while cutting holes
for the sockets.


Cutting is easy – hot wire deals with styro with ease. All you have
to remember about at this stage is cutting holes slightly bigger than
bases.
Also don't throw away cylinders left after cutting the thing – these
will be useful a bit later.

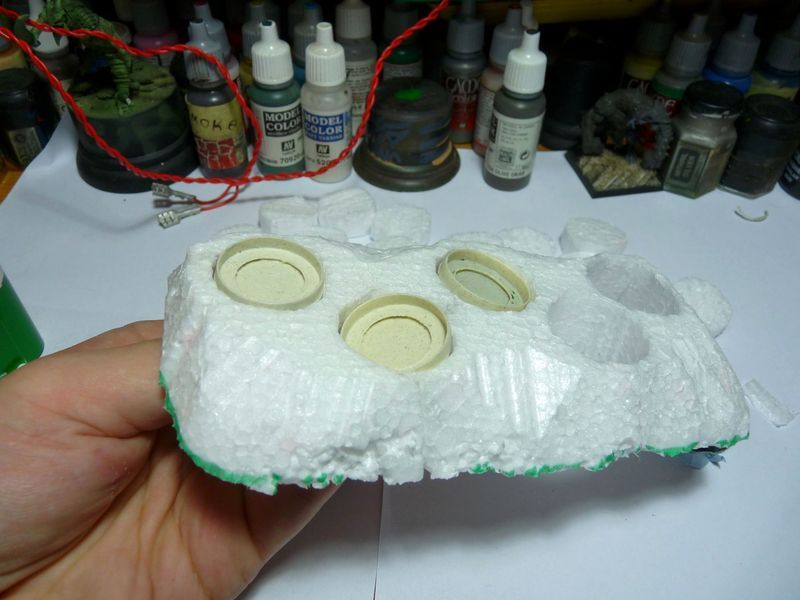
It's time to prepare styro-plugs for the work ahead. I simply cut
them in 2 slim parts – don't have to be very precise at this step, these
parts will
be just a filler.


Making sockets for miniatures
The plan is to fill holes in the base with sockets and prepared styrofoam for better bond.

The socket was made of citadel paint pot lid: if you use these paints
it's good idea to collect the lids – inner part is just
PERFECT for 25mm round bases*. I still have some pots from Citadel range
but because I mostly use Vallejo brand I made a single socket and
recasted it for
the whole Necromunda gang.

The procedure is simple:
Put the styrofoam on the back and place sockes in the holes (I told ya to make the holes slightly bigger, didn't I?

).

Hit the sockets with some glue – once again polymer (it's really fine but it requires some time to try) and then cover it with
slim styro plugs.


Texturing the surface
Now we'll fill the gaps and give the base better surface to glue the sand bit later.
I took some plaster and mixed it with water until if got consistency of yoghurt (more less)

At first I was trying to apply it on the base with knife or some spatula but after 5 seconds I realised fingers are much better
for this job.
Remember I wrote there will be wife / gf / bro required? That's it!!!
That's the stage!!!! I couldn't play with plaster and take pictures
without making the camera really dirty (and probably – ruined if the wet
plaster hit the lens)

The dirty job is dome – give it some time to dry. I applied pretty
thin layer so after having a coffee (right side of the pic) and
taking dog for a walk (~30 mins alltogether) I could continue the work.

Bases of all Agent Orange members are really simple: small gravel + sand painted with washes and then drybrushed. I think
simplicity is ALWAYS the key especially in case of gaming models. Therefore making group base was no problem at all.
I prepared some fine sand and some gravel.

Repeat the procedure on whole base just remember – work on small area
at once because diluted glue can sink into plaster if you
give it some time.
When you got it done – leave the base to dry completely. And I mean it –
be sure it's totally dry before the next step which is removing excess
of sand with large, soft brush.

Now we have to make sure sand and gravel won't fall off during painting
Great way to ensure that is painting whole base with heavily diluted
pva glue – some gravel will fall off now but not when you will be
drybrushing
the base. After pva dried I painted base once again – you can never be
sure enough…

Once again it's time for waiting game before some paint can be slapped. Of course thank to the modern cosmic technology we can
shorten waiting.


Painting the display base
I tried to paint the thing more less the same as bases of all
gangers. So first I mixed devlan mud wash, a bit of smoke and lots
of water. Diluted paint dries up a while but it is easier to control:
you can add another layer whenever you think the base should be darker.

After that I added some deeper shadows using dark olive – once again
heavily diluted. I chose this color because I also used it to
paint bases rims of my gangers – this trick should unify models with the
big base.

Wait patiently until the wash dries – the next step is drybrushing:
I started with bleached bone and then applied highlights – skull white. Both colors were used to paint bases of the gangers.

The base is ok but I want it dirty – I powdered some chalk (dark
olive color) and applied it on the base. Chalk was sealed with
matt spray but turpentine also works fine for this (I wrote about it in
Gorkamorka Ork base text). Besides it's MUCH cheaper than ready to use
dry
pigments.

The last thing was painting the sockets. My first color choice was
black but all in all I decided to use olive. I mixed some matt
varnish with paint to protect the paint – minis will be put on the base
after every game.

Done!
And here are pictures of the final thing taken in the photo tent: I know black background isn't the best idea but black t-
shirt was the only think big enough to use as background – base is pretty large after all…


Once again I hope you found my article useful and once again I hope to update the site shortly.
Cheers!