Showing posts with label Custom bought item builds. Show all posts

Thursday, October 25, 2012

Terrain: Office buildings and lamp posts


I have been wanting to make a large office building piece for sci-fi and superhero games, so I bought six white miniature milk crates as a base to make these simple buildings.

This crate is from Office Depot (item #785-255) and unfortunately it appears to be discontinued.


The first step is to remove the curved section of plastic at the top that imitates a handle. I found that the easiest method was to use a Dremel to cut through the thicker sections, then I cleaned up the cuts with a utility knife.


Next, I made the pieces that will fill in the windows on the sides of the buildings. I used cardboard from cereal boxes and similar packages, cutting them to fit the inside of the crates. I taped the pieces to a board so they would not warp while drying and used a broad, coarse brush to make the streaked pattern seen on these pieces.


Here are the window pieces glued in to the crate with white glue. One of the windows has been filled with white to match the crate.


Next, I filled the remainder of the middle row of windows with white, making an area that represents the separation between floors of the building. Some touch up on the windows is still needed at this point. To have a flat, dark surface on the roof, I cut a square of black craft foam material, applied some spots of dark gray, and used hot glue to hold it in place.


Here are the six crates finished and stacked together as one building. I am considering making some low walls to surround the roofs and other items like air conditioners and stairwells that might be found on roofs. Ideally, these would be stored with other small items inside the buildings.


Along with new buildings, I made a simple set of street lamps. They are made from mass-produced wooden parts: 2.5" shaker pegs and doll stand bases.


There is not much to the construction of these lamps. The pieces are glued together with wood glue and painted. I chose a streaky verdigris paint scheme and painted the lamp area with splotches of white, orange, and yellow.

Friday, October 5, 2012

The Floating Flora of Venus


The local PetSmart went out of business a few months ago, and one of the things I picked up in their going-out-of-business sale was a pack of floating terrarium plants. The long tendril like roots made me think that these would make really cool floating plants for the jungles of Venus.


The plants are plastic, labeled "Water Lettuce", and were manufactured by Exo-Terra. I happened to have a number of peg-type flight stands left over after switching my aeronef fleets to magnets and Litko stands, and I thought these would be perfect for using as the bases for my floating plants.


I cut a few of the central tendrils off each plant to make a spot to clue the top of the flight stand. I used E-6000 glue as I find that works really well on odd plastic surfaces. I'm very pleased with the results, and cant wait to get these in a game.


A Venusian Parrotman runs in terror from the poisonous tendrils of the hovering Venusian air-plants.

Dollar Tree Icicle Ornament Ice Spire Terrain

Dollar Tree Icicle Ornament Ice Spire Terrain

On a recent trip to the Dollar Tree Store I came across these packs of plastic icicle ornaments, and were struck by their asymmetric, uneven shape. I bought a few packs to experiment making terrain for my Christmas Wars games.


I first clipped the hanging ring off of the top end. Then I cut the icicles in half into uneven lengths using a hack saw. I cut them at an angle so they would lean out in random directions when based. I then glued the cut halves onto rough circles I had cut from foamcore. Finally I textured the bases with Woodland Scenics snow.


I'm very pleased how they came out, and I think I will also try making a few and spray painting them and then painting them up like rocky spires for more conventional Sci-Fi and Fantasy games.


Wednesday, August 31, 2011

Firestorm Armada Dollar Tree Scratchbuilt Freighter

Last week I wrote about a 6mm sci-fi terrain piece I made using handgrenade squirt-'gun' party favors that I had bought on a recent trip to the local Dollar Tree store. Today I am gong to show a Firestorm Armada scale freighter I made using the these same party favor grenades. Shown below with a US quarter for scale


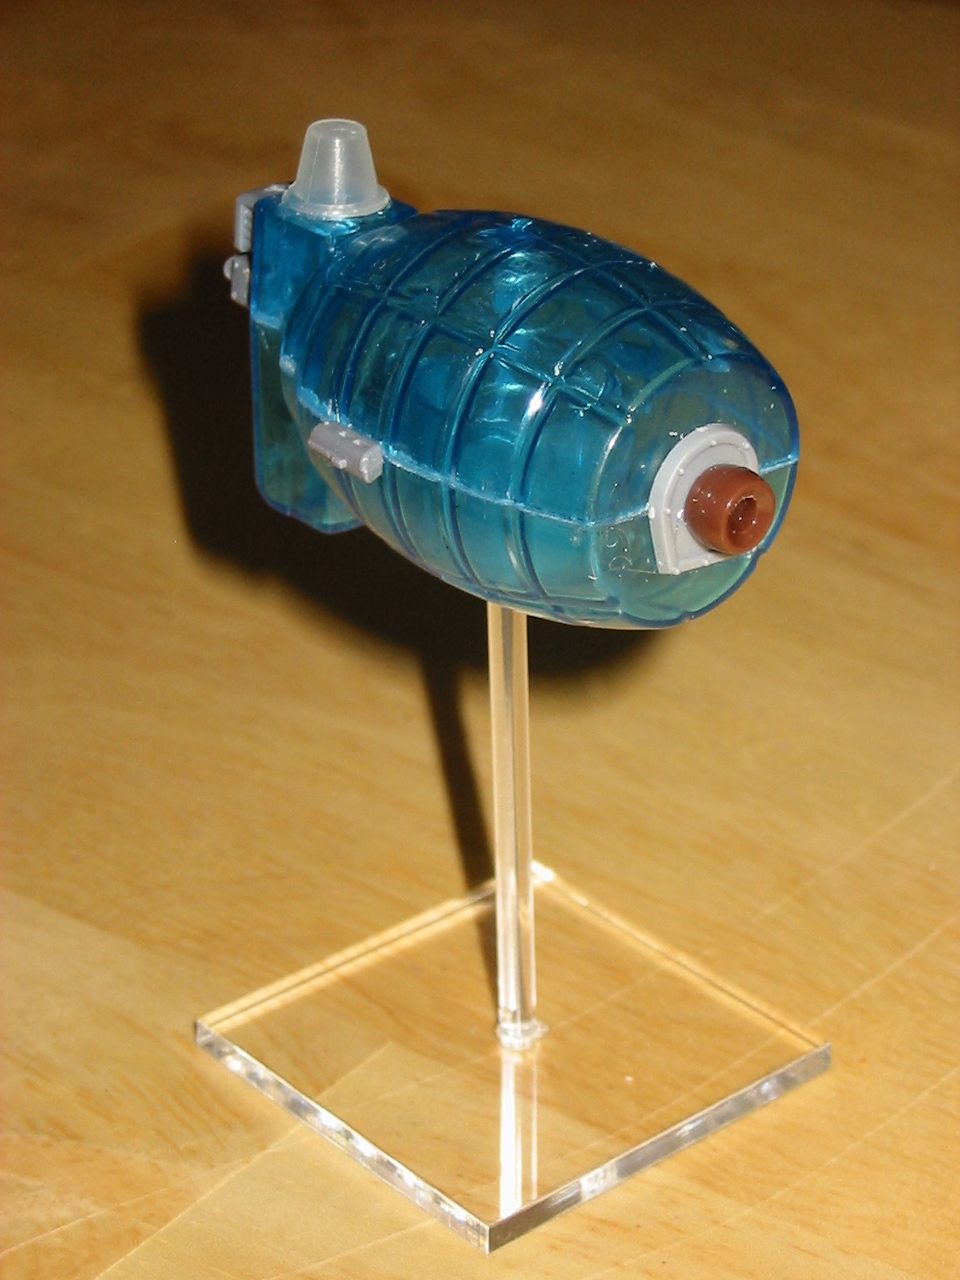
For the hull, I used the handgrenade pretty much straight out of the package. I removed the squirter handle and the cap that inserts in the water well. Then, once again, I raided the bits box to get suitable spaceship 'looking' parts.

The exhaust is a pony bead glued to a goblin shield. The bridge is the front end of a Space Marine bolter. The laser port is a seed bead. The top tower is the water well cap (turned around and covering the hole it went in.). And the two side fins are the muzzles off of Kroot rifles.


Once all the parts were glued on I sprayed the model with black primer. It is shown below next to a Firestorm Armada Sorylian frigate to give a sense of scale.


I then painted the model. I first gave the whole thing a coat of dark navy blue, then painted it with GW Shadow Gray. I then washed it with dark blue ink, and then drybrushed highlights with Duncan Decorator Acrylics Slate Blue. the final touches were to pick out some detail in metallics and then apply a couple decals. The results are shown below, again with a FA Sorylian frigate for scale.


Happy Meal Mystic Portal


My latest terrain project is this Mystic Portal made from a McDonald's Happy Meal toy. It's intended to be similar to the Stargate, or the portal seen in the classic episode of Star Trek (Original Series), guest starring Joan Collins, entitled, "The City of the Edge of Forever".


It all began a couple months ago when my wife and a colleague stopped at a McDonald's while returning from a meeting, and on a whim ordered Happy Meals. The toy included with the meal was from the Happy Feet 2 movie. It consisted of a plastic disc-shaped snow mound with a rotating disc in it, that when you spun it, the disc made yodelling sounds.

My wife, knowing I had made things from Happy Meal toys before, brought hers home for me. When I saw it I was immediately struck by how the snow texture resembled a rocky outcropping and the idea of some sort of ancient portal came to my mind.


First thing I had to do was separate the front and back halves to remove the 'guts' from the toy. I thought this would be easy as it appeared to be only held together by three screws in the back. This was not the case. After removing these screws and doing lots of prying and hacking I finally separated the two halves. The problem is that there are five internal glue points as well as the screws. They really don't want kids swallowing the electronic sound components that were inside the toy.


Separating the two halves had left lots of bangs and dents in the seams where I had used a screwdriver to pry the halves apart, but these were easily covered when I used miliput to fill the screw, and speaker holes, as well as help smooth the seam between the two halves.


I then cut down a CD to make a base, and glued the toy to it, as well as some gravel and sand around the edges. It is shown above with a 25mm figure.


Next step was to spray it with black primer. I used Krylon Flat Black Camouflage with Fusion technology to help it stick to the plastic toy.


After priming, I drybrushed the exterior of the toy and the gravel and sand on the base with various shades of grey to give a rocky look. I then glued assort foliage on the portal, and flocked the base. The final step was to fill the opening in the portal with pillow stuffing to give it that misty void look.


Overall I'm pleased with the result, and can see this being used as an objective, or a source of reinforcements in any Fantasy, Sci-Fi, Pulp, or VSF game. I have a second one of these toys so may make a pair of portals which would make for some interesting scenarios where figures can actually transport across the battlefield.


French Foreign Legion troopers on Venus investigate a mysterious artifact of an ancient civilization.


Halloween Spider Decoration "Giant Spider" Fantasy Unit


It's the time of the year when you can get all kinds of Halloween decorations that are useful for wargaming purposes.  One of those things is packs of tiny plastic spiders. These can easily be turned into "Giant Spider" units for all scales of  Fantasy gaming. 
I recently took a pack I had purchased a couple years ago, and stuck away in a box, and converted them into a great looking unit for my 10mm "Look,Sarge, No Charts: Fantasy, Ancients and Medievals"  armies.
The spiders I got were a pale white-ish green color, so I knew for the start that I would need to spray them black.

A quick coat with some Krylon Camouflage Flat Black, and they were ready to go.  I then glued them on their bases and gave them a fast gray dry-brushing, and some red eyes.

The finished unit.  I got enough in that little pack to make four base and a leader stand.  The bases are 3 x 1.5 inches.

Here they can be seen attacking a unit of 10mm Warmaster High Elves

Thursday, September 27, 2012

Titania City perhaps?

Titania City perhaps?

I hate to keep posting pics of things I'm going to work on but here are some simple crates I picked up at the Dollar Tree store a couple of days ago.  I think we are going to use them for some of the buildings in Titania City.  They aren't big enough for sky scrapers but they might make good shops and apartment buildings.  Right now we are trying to decide how to make interiors for them to make them playable.  The packing trays on top are ideas for roofs.  These are the same things we used for roofs on Station 42 and a number of other buildings in the setting. I think it will help tie them in with the other projects.

Thursday, September 6, 2012

Steampunk interior models


Steampunk boilers, round and cylinder.In my earlier post ( Steampunk diorama ), I promised to introduce these steampunk terrain items to you, so here we go.
These Steampunk -themed interior terrain pieces were made a contest (Arcane Legions -contest by Wells expeditions, to honor H.G Wells on his birthday)  in mind, but I would never have made them if I hadn't had a steampunk game on my mind. I haven't yet used these terrains in a game, but that day will come... anyway, in this article I tell how these pieces were made. If you haven't yet my article about scratchbuilding or basic modelling tutorial, I strongly suggest reading them.
Base material for these models is cardboard. All the walls and floors have been created from 1mm (1/25") cardboard. I happened to have some old cardboard bases I had made for Star Wars/Dungeons & Dragons miniature game purposes with grid drawn to them that I could use in these models - I've drawn the grid by drawning with a ruler and a black ball-point pen (an expendable one) while pressing the pen very hard very hard. The plates where than spray-painted with two or more different colors to achieve right color. 

Putting the wall and the floor together

How to glue the wall and the floor together
After glueing the pieces togehter, I went the easy way; I glued a paper from floor piece to the wall piece to keep the pieces togehter. I created the pieces to be one-sided, but if you want them two -sided you should glue another wall piece to the other side.

About plank floor and paints 

You can also see plank floor in the diorama picture. It was salvaged ages ago from somewhere in the net, can't find it anymore - just make a google image search for plank floor or plank floor pattern and you should find something you can use. 
About paints - all of the model features were primed with black spray paint. they were than painted with a combination of various paints. Not even just various colours, various types of paints - for example, I don't have gold miniature paint, so I used acrylic color instead. I've used this technique for quite a while and haven't seen any complications. Mixing brown with a bit of red and gold, and adding other colors when needed should get you far. Of course you can use bronze or similar color if you have such already.
Note about spraying - you should be aware that most spray paints melt down styrofoam!

The models themselves

Steampunk boilers, round and cylinder.
These boilers have plastic hull; The round one is made from a ping-pong ball and the second one from an empty ink-jet printer ink shell. Pipes are made of straws, and few other small salvaged plastic pieces are used for the rest of the parts. The meter is just drawn with red crayon and black inkpen, base of it is two pieces of 1mm cardboard glued togehter. I drilled a small hole to the hull of the tank and cut part of the meter's cardboard off from the middle so I could put a bit of wire inside the meter and plug it in the tank.
Steampunk wall with embedded gears, steaming pipes
The clear pipe here is a part of a drawer handle from Ikea. The wheel I'll explain a bit lower; Steampipes are actually salvaged from my Star Wars terrain as I was in hurry - cardboard base, straws, salvaged pieces of plastic and press-stud buttons. See my fire modelling tutorial to see how the smoke was done.
Various steampunk pieces, a concole and an electricity -thing.
Some cardboard structures and cocktail sticks here. Meters are drawn to paper with inkpen and then cut off. The 'thing' on the right is from a broken lightbulb, rods in the console are pieces of thin wire with a drop of thick paint at the end of them. The thing on the piece's left end is made from a ball-point pen's lower part, a wooden sphere (from hobby shop, meant for creating wooden neclaces, bracelets etc) and a cocktail stick.
Steampunk embedded wheels and gears, a hatch
The hatch is made out of a 5-cent coin and half of a press-stud button. Simple, isn't it? Not the most impressive piece ever but works ok. Pipes are straws, hole in the left wall is just two more layers of cardboard (one has only borders, the other one is cut to the wanted shape.

Modelling gears and wheels for Steampunk models

Now, to the gears. I've first printed a sheet of paper full of various gears I've found online - just use google image search and 'gears'. I've scaled and combined what I've found using Gimp so I'll need only one paper. I've printed the paper and cut the gears out - you don't have to be accurate, you just want to separate the gears, not create correct shapes out of the pieces of paper; Paper is just a tool. When you have the pieces ready, glue them to various piecs of cardboard, foamcore or other materials you can easily cut. Use a glue that doesn't damage the pieces - for example, photo glue that is supposed to come of quite easily is good for this. Once you have glued a picture of  a gear on the wanted material, you can use precise cutting tools to cut the gears out (you read the tutorial, right?)
I've used various techniques to fill the edges of a foamcore, depending on case; A strip of thick paper/thin cardboard can be glued on it, a filler paste can be applied to it or then you can just use thick paint to seal it.
Large gears, one extruding from the floor and other fully exposed
This should be quite obvious after reading the earlier descriptions. Everything new are wooden pieces from a hobby store (small sphere and the funnel -like piece)
Steampunk wall and a great window
And finally the great window - the window is made of foamcore, and pieces of a plastic pipe are glued on it.

Saturday, September 1, 2012

wood pallets

Well I have bought several pieces of terrain for my city of Gravesend as you may have noticed. And I will show them all when they have been painted. This blogpost is however not about these. As I watched a movie I noticed the wood pallets. And it struck me...In most places you do come across woodpallets. I myself can get hold of 3 within 10 minutes. Just lying around. Gravesend needed some of these as well!
So I set to work. I already had what I needed. A pair of clippers, glue, ruler, hobby knife, cofee stirrers from 7ELEVEN, (I bought a coffee, so they are free!) and a piece of bigger size wood I bought cheap from a hobby store. Mr. Romero is in the picture to give you a sense of scale and making sure I did it right!
It actually looks like firewood in this picture. Measure them up to fit in the size you want them. I tried to keep them in a size to fit the bases of my miniatures as that would match real life pretty well.
2 pieces of the bigger wood and 3 of the coffee stirrers. I put one underneath as well as it looked much beter. It was actually my better half who suggested that.
Paint them as you like, I just gave them a bit of wash. This really took no time at all! Give it a try to fill a bit more barricades and obstacles in your gaming!!