Showing posts with label 28mm. Show all posts

Friday, November 15, 2013

28 terrain 1/35 kits

8mm scenery from 1/35 diorama kits

Hi again,

This week I thought I'd show a bit more on how I made the 2 warehouses in the background of last weeks figure shots.

In a nutshell, they are made from a single Miniart Workshop kit in 1/35th scale. These are great kits as they contain loads of vac formed brick walls, roofs, rafters and injection moulded doors, windows and lamposts etc. Many purists would say the bricks are too large for 28mm but I think they look fine for gaming puposes.
As I said, this particular kit has enough brick sections to make the inside of the building as well so all I did was glue each section to thin plasticard and made 2 buildings instead of having internal bricks.

The tiled roof building is pretty much standard and the tin roof one was made using the extra bits. I had to make a new tin roof from thin corrugated card and used some of the supplied rafter sections to make the wooden planked loading bay door section. Sadly, you only get one double industrial door so I had to scratch build the two doors for the tin roofed building but this didn't take long. The roofs are removable and there's plenty of room inside for gaming.

For the painting I undercoated them both with dark brown emulsion then simply used matt emulsion tester pots in shades of terracotta and green for the painted wood and codex grey for the concrete areas. I used a few GW brown washes to dull things down and rubbed some white chalk powder over some areas of brickwork to simulate paler cement (this makes a big difference to the overall effect).

Overall, I'm really happy how they came out as they are great for all sorts of periods and pretty sturdy as they are plastic.

Laters Si


Thursday, October 25, 2012

3rd map and how to make building out of bins


This week we hosted the second installment in our annual Halloween zombies game. For our initial effort last year, Tim (our zombie gamemaster) set the bar pretty high, with a walk-right-up-and-play urban horror game featuring desperate survivors and mindless zombies. This year, we turned the dial up to 11 with more terrain, more players -- and of course, more zombies. Here's the zombie pool that Tim used to populate our map.


For last year's game, we used All Things Zombie with a few modifications. This year, we used Blasters & Bulkheads, which did an excellent job simulating a small group of heavily armed heroes blasting their way through hordes of walking dead. B&B has a "henchmen" mechanic that was well-suited to running the zombies -- keeping them dangerous in big groups but also giving survivors a chance to escape.

We set up a tabletop with all sorts of urban terrain, including office buildings, abandoned military checkpoints and an industrial area with fences and warehouses. Here are a couple of the little vignettes that helped tell the story of the last days of New Chicago.

What's this? An abandoned medical supply depot? Who knows what's in those barrels...


And over here, it looks like the military fortified this office building against the oncoming horde. But where are they now...?


Prior to the start of the game, each player selected two armed survivor figures from a big pool of maybe 30 figures. Then Tim randomly generated each character's stats. They were assumed to be armed with exactly what the miniature was carrying -- little wonder, then, that the shotgun-wielding figures got selected first!

The players started their figures in a couple different board edges. Here a small group of survivors creeps onto the battlefield. By the end of the game, we had developed a persona for the guy in the tan coat -- his name was Jimmy Jaworsky, a tough-as-nails South Sider wearing a Bears jersey underneath his jacket. Yes, I put on my very best Chicago accent when it was Jimmy's turn to activate.


Across the board, Tom's two survivors found themselves in an abandoned industrial area. A warehouse loomed up ahead, so Tom sent Professor Paulsen -- an aging, tenured scholar from the University of New Chicago who nonetheless knows how to handle a shotgun -- to explore.


Tim came armed with plenty of random charts to aid in our looting efforts. In this case, Professor Paulsen stumbled across a handful of zombies -- and two survivors cowering behind a stack of crates! After Tom's two survivor characters dispatched the zombies, the two newcomers agreed to join the survivors, giving Tom two more figures to control for the remainder of the game.

To the north, a multi-story garage loomed against the darkened skyline. That's where Karl sent his two survivors, who were both clad in bright yellow biohazard suits. Perhaps they were scientists before the outbreak?


Inside the garage was a garbage truck, a formidable mode of transportation with the potential to squish dozens and dozens of zombies -- if only Karl could get the vehicle started! His attempts created a lot of noise, which brought even more moaning, groaning zombies to the scene.

As with last year's scenario, noise played an important role as the game unfolded. Fighting in melee, starting cars, shooting firearms -- all of these things generated noise, which in turn could attract zombies. Sometimes a gunshot or scuffle wouldn't result in any undue attention from the undead, but other times a half dozen zombies might show up, hungering for flesh.


Anyway, back to the game. Across the map, Jimmy Jaworsky was getting himself into a bit of trouble. He spotted a high-end sports car peeking out of a shipping container, and Jimmy decided that this was the ride that was going to get him out of New Chicago once and for all. But as he closed in on the vehicle, two small groups of walking dead stumbled after him...

Meanwhile Mike's two characters -- a grizzled military veteran and a plucky girl sidekick -- commandeered an old pickup truck, got it running, and began zooming across the map, splatting zombies left and right. 


They sideswiped a big mob of zombies that were harassing Jimmy, then skidded around a corner and headed off into the industrial sector to help out Karl's survivors.


And speaking of Karl's survivors -- they finally got the garbage truck up and running, but about a dozen zombies were thronging around the garage, pursuing two different groups of survivors.


By this point Karl's survivors had mobilized the garbage truck, and Mike's survivors were careening around the map in their pickup truck.


Poor Jimmy Jaworsky had gone to the big Polish sausage stand in the sky, though -- he was ripped apart and devoured by eight zombies as he attempted to hotwire an abandoned car. Professor Paulsen, too, went on permanent sabbatical, as he was dismembered by zombies in the industrial sector. Luckily Tom's other survivors proved particularly adept at self-preservation, and they emerged onto the streets to meet the garbage truck saviors.

We called the game there, as Games Plus was about to close. Everyone had plenty of praise for the scenario and for Tim's gamemastering. The game was fun, bloody, exciting and grim, just like any zombie apocalypse game should be! Here's the final photo, showing the garbage truck plowing into a mob of zeds.


Doubtless we'll run a zombie game next Halloween. Until then!

Saturday, October 20, 2012

Roadsign - made


I was able to do a little printing today, and I printed out a road sign and made it up using card, some toothpicks and a small piece of balsa for the base.

 I am very happy with the results and I think it looks great.


Now all I need is a road to put it next to.

Friday, October 12, 2012

DIY Hedgerows and Artillery Markers


I wouldn't say I'm cheap.  Well, my wife would.  So would my kids.  And my parents.  And pretty much anyone who knows me.  So when I decided to game the Normandy Campaign of 1944, I was a little anxious about filling the table with bocage terrain.  All those hedges, done in resin, would be incredibly expensive.  Besides, I wasn't thrilled with the look of the commercial models available.  I had been to Normandy in 2004, and I wanted a combined earthen embankment with bushy foliage atop it.  And I wanted lots of 'em, so that my table would look a little like the image below, taken from Google Maps of the land just inland from Omaha (where my Grandfather landed on June 7th.  He was in the 29th but his regiment, the 175th, avoided the 'Saving Private Ryan' landing by being the divisional reserve).
My mission, to make lots and lots of hedgerow markers.  They had to be cheap, they had to be quick, and they had to look good.  I assembled the following materials:
*Popsicle sticks (thank you dollar store!)
*White glue (again, a dollar store special)
*Small pebbles (is use commercial talus, a $3 bag I bought years ago.  I used maybe a tenth of it in this project)
*Sand.(I took a jar from the playground where my kids play)
*Craft paints ($2 a tube.  You need some to represent earth, and some white to lighten it for drybrush highlights)
*JTT Coarse Foliage-Fiber Clusters (Light Green).  (At $5 a pack, this was the expensive part of my project.  A pack is good for about 40 4" hedgerow sections)
I did my hedgerows in batches of 16-18.  First, I laid down a thick coat of white glue on each popsicle stick.

Then, I packed as much talus onto each stick and allowed it to dry overnight. My goal was to add some shape and height to the embankment, which I would not get if I simply used sand alone.   I suppose this process could be repeated for an even steeper embankment, but for me it was not worth the time.


The next day, I covered the talus with a watered down white glue (1 part water to 1 part glue).  Then, I liberally spread sand atop the glue.  This takes some of the rough edges off the talus, making the embankments look more like earth than rock formations.  Then I allowed them to dry overnight.


Apply a coat of spray primer.  I use black.  I suppose I could have saved time by using a brown color similar to the earth tones I normally use for dirt.  No biggie, though.  When that was dry, I applied brown craft paint liberally on each popsicle stick.  Craft paint is not as pigmented as my model paints, so a few coats were needed.  Craft paint is cheap, though, and these are simple to paint, so it went fast anyway.  When I was happy with the result, I applied a lighter shade with a drybrush to bring out details and textures in the embankment.  You can see the different drybrushing makes in the stick in the foreground below.


One last step: apply a generous line of undiluted white glue atop the painted embankment.  Pull out a foliage clump and roll it into a 4" long snake. When it is the right length, press it firmly into the strip of glue.


The finished product.  It stands about 1.5-2.0 centimeters high, more than enough for 10mm or 15mm troops to seek shelter behind.


And here is my latest batch laid out on my dining room table.  Three more batches, and I should have enough for a real boage rumble.  Cost per 4" section works out to under $.20.  And while they took three days to make (owing to the time each layer of glue or paint took to dry), actual worktime was under two hours for 18 sections of hedgerow.


At the same time, I also bade some quick and easy artillery blast markers.  All it took was some steel wool (#oo grade), some epoxy cement, sand spray primer, a few pennies, and some paints.

First, I tore clumps of steel wool about 3" high and used the epoxy to glue them to the pennies.  I sprinkled some sand around the edges of the base, to create more textured earth when I painted them up.  I teased the steel wool out into slightly irregular shapes so it looked like a rising smoke cloud.


Back spray primer creates the distinct impression of a smoke cloud. I left several markers unfinished at this stage to use as smoke markers on my battlefield.  For artillery blasts, I saturated the steel wool close to the base, first with red, then with yellow paint.  Then, I lightly brushed the outer fibers with yellow, red and white.  Paint and highlight the bases an earthen color and...voila!  Blast markers for mere pennies!

Friday, October 5, 2012

pill box

Finished Pill Boxes

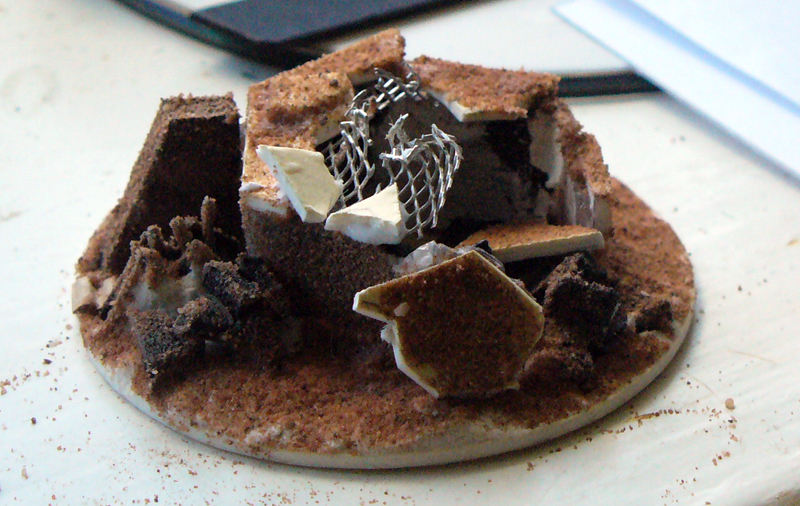
Finished the 4 Pill Boxes, with some green flock and dry brushing, the bottom three pictures show the destroyed Pill Box with the wire mesh picked out in rust colour. Over all very please with how these have turned out, they will bring the coastal defences up to strength in combination with the heavy coastal battery already produced.
Next up I will be having a go at producing some explosion markers, both on the ground and also air burst explosions. I have also been looking at producing 10mm scale buildings for my Early WW1 set up. I have briefly blogged about this before. The GHQ micro collection has been expanded over the last two years, so time to explore the possibilities. 
TTFN
Airhead

Saturday, 9 June 2012

Bunker busting

OK so it should be "Pill Box busting" to go with the other titles in this project, but Bunker busting sounds much better in my opinion. the first picture shows the pill box before the application of PVA and sand to texture it. The construction was identical to the other three pill box's up to the point at which I started to destroy it!
The wire mesh was quite soft and easy to cut with a craft knife. I was going for the idea that the pill box had been destroyed by a direct hit on the roof by a heavy artillery shell or large bomb. I wanted the pill box to still be recognisable as a pill box, so not reduced to a pile of rubble. So 2 out of the 6 sides have been destroyed and the roof slab of concrete shattered and pushed off to the front and sides. Please with how its worked so fare and I must find more projects to use the mesh in.
More pictures of this one and the three others finished to follow shortly.
TTFN
Airhead

Thursday, 17 May 2012

Pill Box progress

Just a quick update on the progress on the pill box front, bottom picture shows the pill box's PVA'd and covered with sand, the rigid plastic of the cocktail stick container takes the PVA glue best if it is rubbed down with sandpaper first to provide a key for the PVA to stick to, otherwise the PVA beads on the surface.

The top picture shows the start of the construction of the destroyed pill box, the mesh is from a car body repair pack. Its soft aluminium and can be trimmed with a knife, the roof section has pencil lines showing where the roof will be cut up.

TTFN

Airhead

Tuesday, 8 May 2012

Cocktail sticks into Pill Boxes

After all the trees this year I thought it was about time I went back to producing something of a more military nature. I always intended to produce some pill boxes to support my costal artillery bunker from July last year (link). In my local Morrisons supper market I was looking for some cocktail sticks for another project, and when I found them low and behold they came packaged in a great little hexagonal plastic box. The perfect size and shape for a 15mm scale pill box. And for the princely sum of 36p.

The second picture from the top shows the container cut into four sections. They then have roofs cut from art board and round bases to mount them onto. I then cut out some blast walls to go either side of the door. To save on the amount of time spent on producing the pill boxes, rather than cutting gun slits into the brittle plastic I cut slits into rectangles of art board and then stuck these onto the pill boxes.

Next up will be adding terrain to the bases and make a start on the destroyed pill box.

Air burst round 3


Some picture of the Air burst explosion markers in there near final stage, just a few final touches needed. Top picture shows all six markers, the second two pictures show two of the markers with one of my 28mm Russian Cross Fire stands, giving an idea of the size of the markers. I'll be using them with my 28mm / 15mm / 10mm forces.
Having done these markers, it has lead me into thinking about other  opportunity to produce similar items. I'm currently producing a 15mm German para flame thrower, I'm also working on some smoke markers for my 15mm Vietnam forces and more ground explosions.
TTFN Airhead  

Monday, 16 July 2012


Air burst round 2

Just a quick update on my progress with the air burst shell markers, the top picture shows some of the original armatures in the background with three explosion markers with clump foliage in position in front. The middle picture shows one of the air burst markers, the picture was taken from quite a high perspective, which makes the arm in contact with the ground look quite short, its not. You can also see I've glued some small stones to the bottom of the shell burst where it comes in contact with the ground. The idea being that where it comes in contact with the ground it will kick up debris, stones and dust.

I used UHU glue to stick the foliage clumps to the wire, and once dry I went over it with super glue to make it hard. I broke the foliage clumps down into smaller bits to make it go farther. The bottom picture shows an air burst that landed on the ground! things don't always go to plan. That was also the thinking behind the air burst which has the bent arms, making it look like it went of but not as intended. Nothing based on fact, all just made up in my head.

Next stage is onto the painting stage. The left hand marker in the top picture is my first attempt, TTFN, Airhead.

Six rounds rapid fire, air burst

Right next project up, so to speak. Some air burst explosion markers. The is nothing quite like blowing stuff up and just making the noises is not enough for me, I have to have some form of visual marker. So rather than starting with the more conventional ground based explosion markers, I decided to have a go at making some air burst shell markers. 

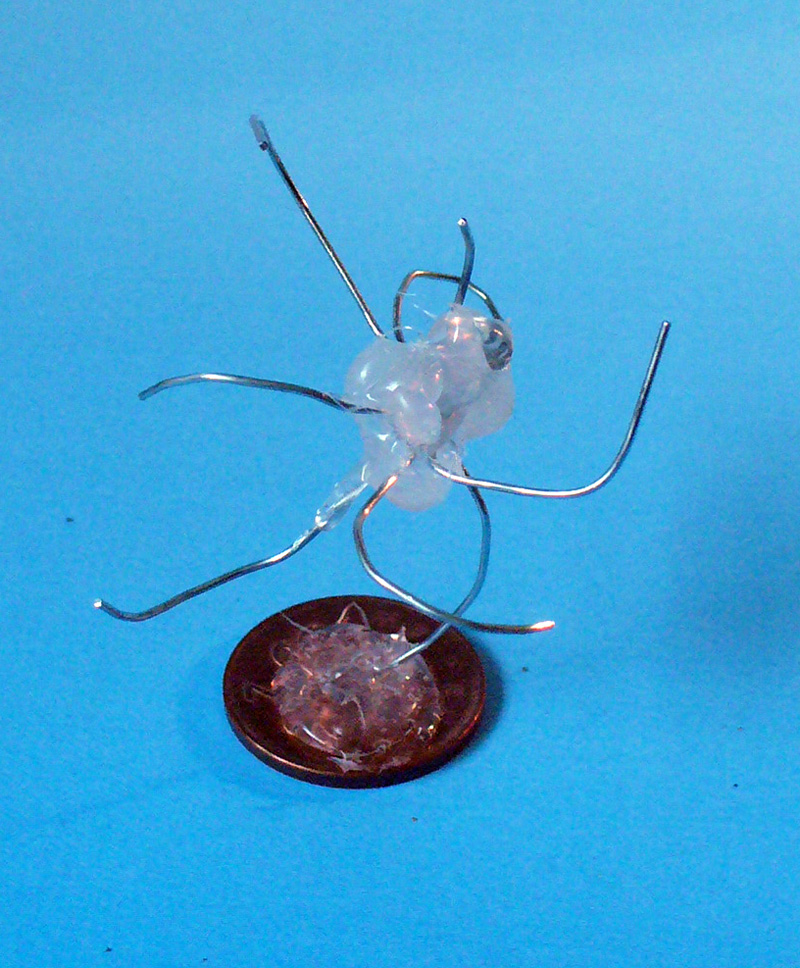
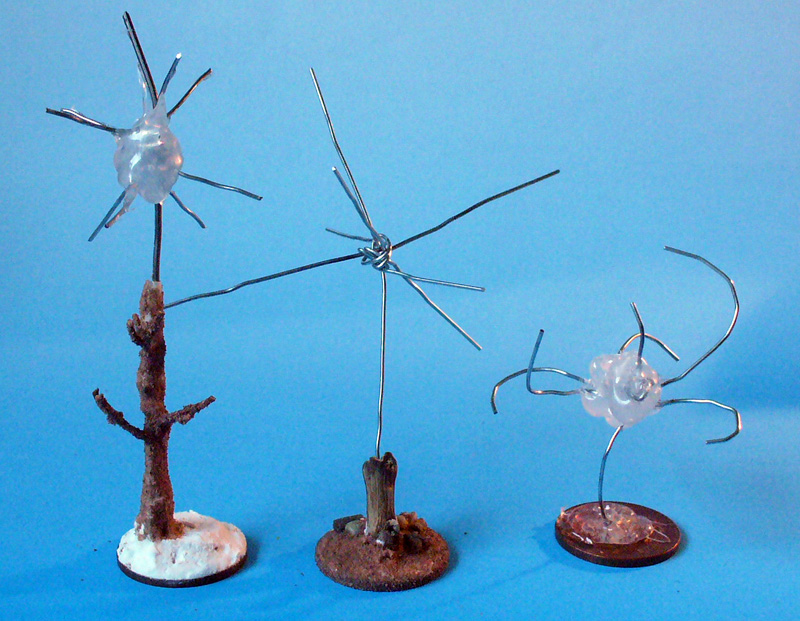
I started by sketching out some ideas, when doing this type of project I always find it helps if I think about how a stop motion animator would visuals them. The idea was to have a range of sizes from the initial small size to bigger more spiky examples. I wanted to produce six unique air burst markers. rather than six identical models. The main component of the bursts was made from paper clips, hot glued onto 2p coins. Each air burst had 8 - 10 arms of wire, one of which was attached directly to the 2p coin, or alternatively onto a terrain feature such as a tree or tree stump, to give the explosion that extra bit of height from the ground.

The trunk of the tree is one of the wire arms of the explosion, rapped in masking tape, with small grape stem branches added. The tree stump is a small twig from the estate, with a hole drilled down the centre and wire pushed into it.

The next stage will be to start to cover the wire frames with clump foliage. TTFN back with more soon.