Terrain Tutorial: Pipes
Here's a quick and easy way to make piping for your buildings, useful whether it's a sci-fi or steampunk setting.


What you will need:
A selection of styrene rod and tubes
Heat gun
Hobby knife
Thin super glue
The styrene rod will be bent into shape to form the pipe, and a ring cut from a section of tube will be added overtop to create the illusion of cuffs where the pipe segments join.
For this tutorial, I'm making pipes in two different sizes. The larger pipe uses 4.0mm rod and 5.5mm tube. The smaller uses 2.5mm rod and 4.0mm tube.

When selecting styrene for the thickness of your piping, be sure the tube fits perfectly over the rod without any gap.

Bending the Pipes
A heat gun is made for stripping paint, but it works just as well to bend plastic. Make sure you read all the safety information, and work in a well ventilated area with an appropriate respirator so you don't inhale any toxic fumes (you are melting plastic, after all).
I suppose it's possible that a hair dryer may do the trick, but I don't know if they get hot enough to evenly melt thicker plastic. It would certainly take longer. A heat gun is only $25-$30 and is a pretty handy tool to have for terrain building.

To create bends in the pipe, hold the rod over the edge of your table, and turn the heat gun on. The low setting is usually enough. (Keep the heat clear of your cutting mat and table so they don't burn.)

Hold it over the spot you want to bend and wait for the plastic to go "limp noodle."

When it starts to bend, turn off the heat gun and use the handle of a tool to hold it at the desired angle. Wait a few seconds for the plastic to cool...

...and you'll have a clean bend without any crimping.
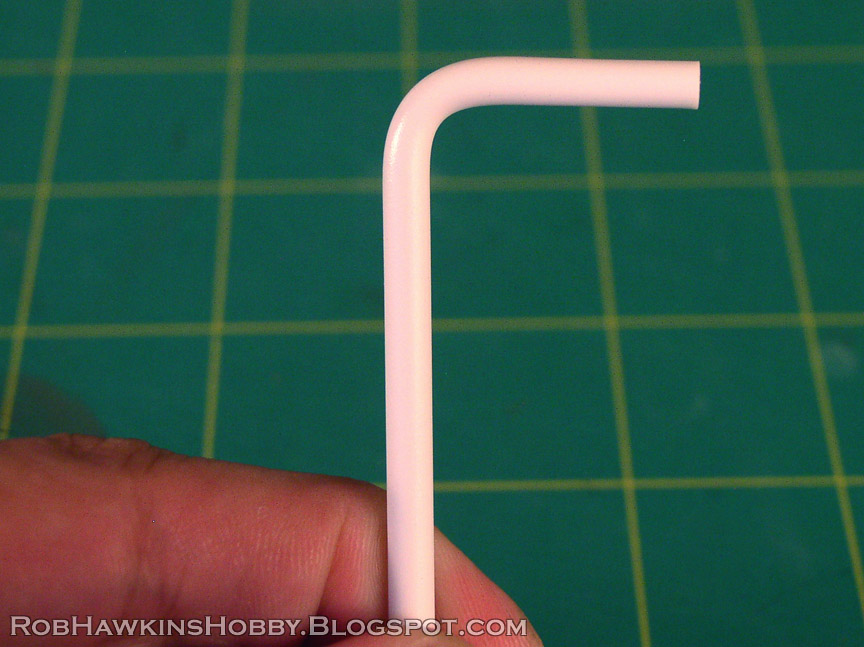
Add as many bends as you like, and create turns in the pipe by bending the rod in perpendicular directions.

It may take a few attempts to get the feel for bending the plastic. Occasionally, you'll get a wonky corner. If that happens, hit it with more heat to soften it again and square off the bend. (Crooked bends can be useful for making dented or damaged pipes, so don't throw them away if they become unsalvageable.)

Be careful not to heat the rod too much or the plastic could swell, making it impossible to fit the rings over the bend in the next step.

Once all the bends are made, trim the ends of the pipe to the desired length.

Cutting the Rings
Use a new, sharp blade for this step. Measure about 1/16 to 1/8 inch from the end of the tube (I just eyeball it). Place your knife on the tube and roll it back and forth to score all the way around.

Keep the knife straight and controlled so the cuts line up all the way around. This image shows a cut that didn't line up properly. If this occurs, just cut off the end section and try again.

If the tube is small enough and the blade sharp enough, you may be able to make a clean cut by pressing straight through. The "rolling cut" technique will allow you to cut evenly without squishing the tube. Either way, make sure you have a backstop to prevent the pieces from shooting across the room when you're cutting.

Try to keep the rings a uniform thickness. Don't sweat it if you have to cut more than you'll need. Compared to the amount of styrene rod used, you'll have plenty of spare tube to make mistakes on.

Attaching the Rings
Once you have enough rings, it's time to assemble the pipes.

Slide a ring over the end and around the bend.

Then, add a drop of thin super glue. I'm using Zap-A-Gap Thin CA glue (in the pink bottle). The thin CA glue will run around the seam and secure the ring in place.

Then, add a second ring, creating the illusion of an elbow segment joining two straight pieces.

Finish off the pipe with a ring on each end. If you have a particularly long straight section, you could add a few rings along the length so it looks like several sections joined together. It probably bears mentioning that you should work from the center out toward the ends since you can't slide the rings over each other.

Here's a large and small pipe side-by-side.

Placement and Painting
The perpendicular bends are useful for fitting pipes into corners.

By adding multiple pipes you can create a visually interesting space, and step up the level of detail on your terrain.

This is the same arrangement from the side, as if the pipes were suspended from the ceiling and wall.

Paint the pipes with P3 Pig Iron and wash them with P3 Bloodstone for a rusty metal appearance.
For copper pipes, paint them with P3 Molten Bronze and wash them with a mix of P3 Thrall Flesh and P3 Arcane Blue to create a patina.
No comments:
Post a Comment